
Create a Snowpark Pipeline Pt. 2
Create Multiple Dataflows Using Snowpark Transforms
In this guide, we'll be creating a new set of pipelines that combine weather and cab data to produce more advanced analytics on cab rides. As with the previous Snowpark guide create a Snowpark pipeline, it is recommended to work through the create a Taxi Domain and create a Weather Domain guides for a more general introduction (and to set up an S3 connection).
Note that this guide will create 2 dataflows: Cabs (the main, advanced pipeline that will end with our final analysis) and Weather (a brief, straightforward pipeline that ends with a data share). We will build out the first part of the Cabs pipeline, switch over to complete the full Weather pipeline, and then back to Cabs to round out the full pipeline.
Pipeline 1: Cabs Pt. 1
The overall purpose of this dataflow will be to:
- Ingest cab data that we'll eventually clean up and combine with our weather data
- Produce analysis on tipping behavior
A majority of our work in this pipeline will revolve around cleaning up and massaging the data in Snowflake SQL before running more complicated analytical transforms in Snowpark.
Let's begin!
Step 0: Create a New Dataflow
If you don't currently have a blank dataflow open, navigate to your Ascend environment home page and hit the New Dataflow button above a data service and title it Cabs.
Step 1: Create the Read Connectors
First, we'll pull in some data to use for our dataflow from an S3 bucket.
Create the CLEAN_YELLOW_CABS Read Connector
Select Read Connector from the CREATE menu on the tool panel. Select the Sample Datasets connection made in create a Taxi Domain.
If you don't have that, that's alright! You just need an S3 connection that points to the ascend-io-sample-data-read S3 bucket.
Once you see the connection, select USE. On the next screen, hit the Skip and Configure Manually option.
On the Connector Configuration screen, fill the following fields with their respective values:
| Field | Value |
|---|---|
| NAME | CLEAN_YELLOW_CABS |
| OBJECT PATTERN MATCHING | Match |
| OBJECT PATTERN | NYC-TAXI/yellow_cab/clean_yellow_cab/data.csv |
| PARSER | CSV |
| FILES HAVE A HEADER ROW | Check this box. |
Once all these fields have been filled, click the Generate Schema button. You should see the following schema (make sure the column names and types match):
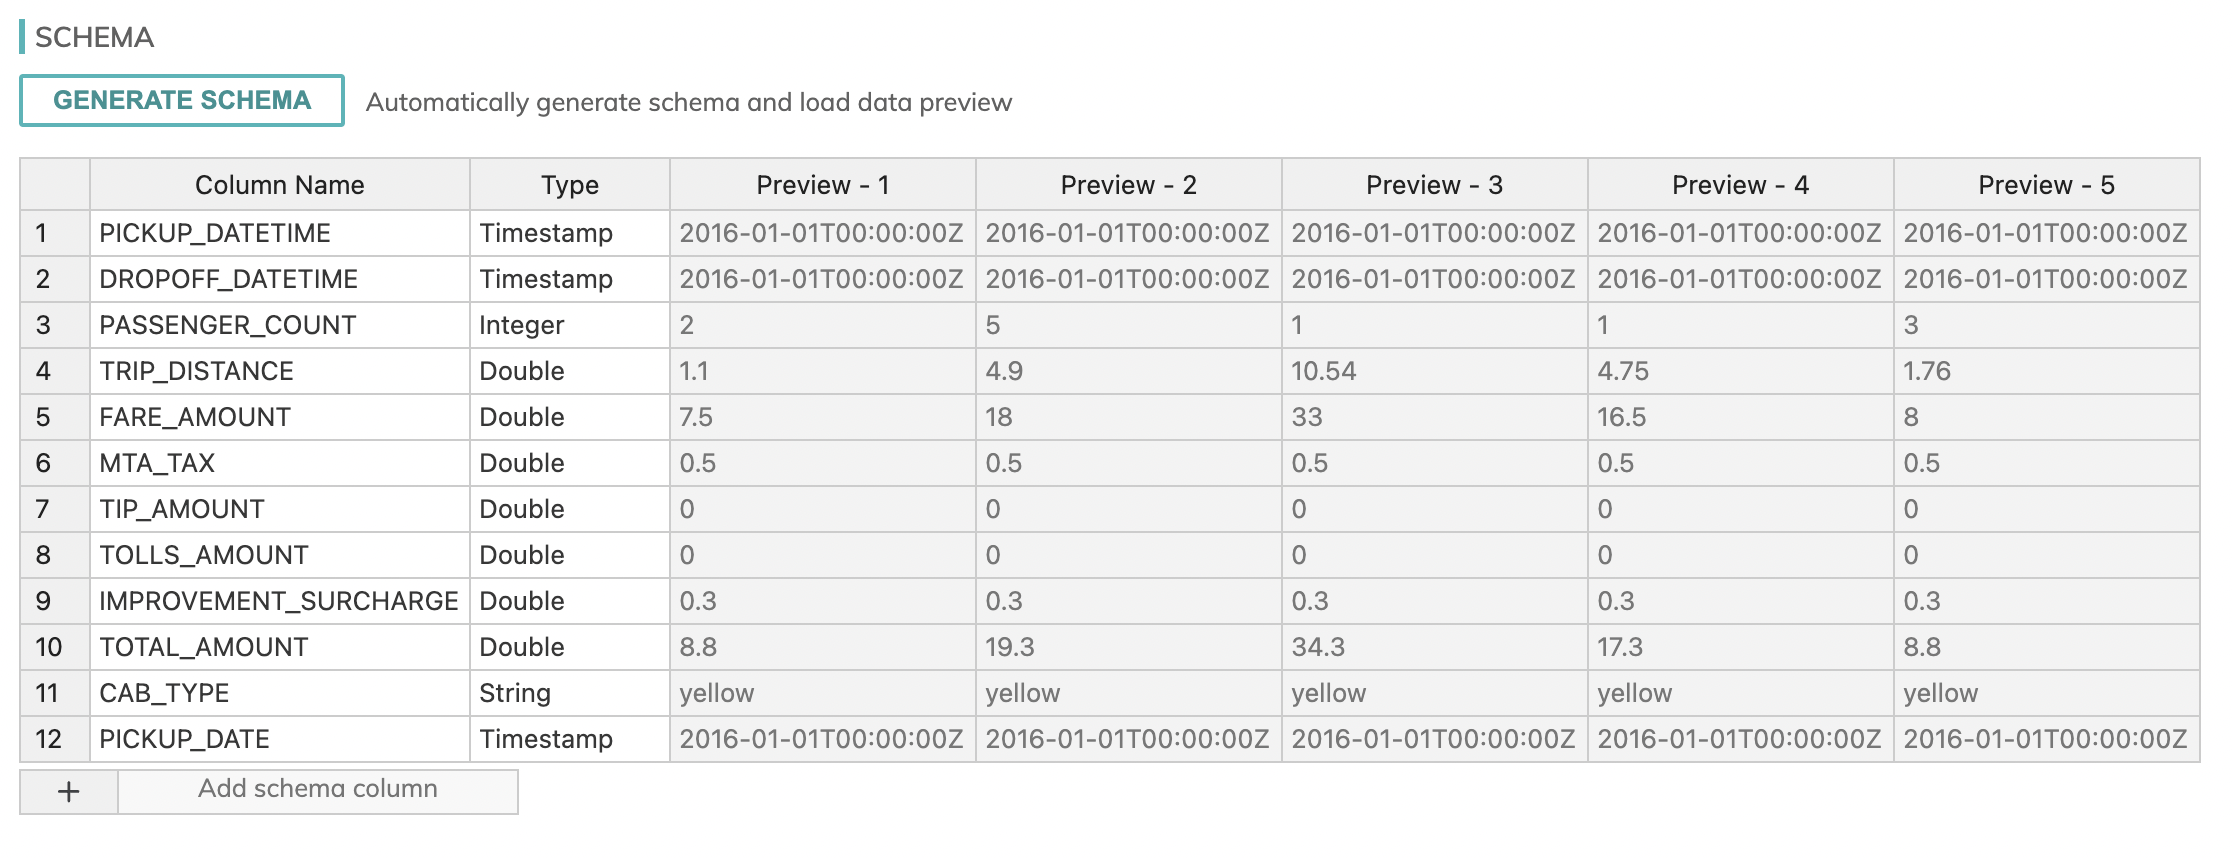
Once the preview of the records appears and matches the above image, you can hit the CREATE button on the top right.
Create the CLEAN_GREEN_CABS Read Connector
Repeat the steps above for another connector but using the following values instead:
| Field | Value |
|---|---|
| NAME | CLEAN_GREEN_CABS |
| OBJECT PATTERN MATCHING | Prefix |
| OBJECT PATTERN | NYC-TAXI/green_cab/clean_green_cab/*.csv |
| PARSER | CSV |
| FILES HAVE A HEADER ROW | Check this box. |
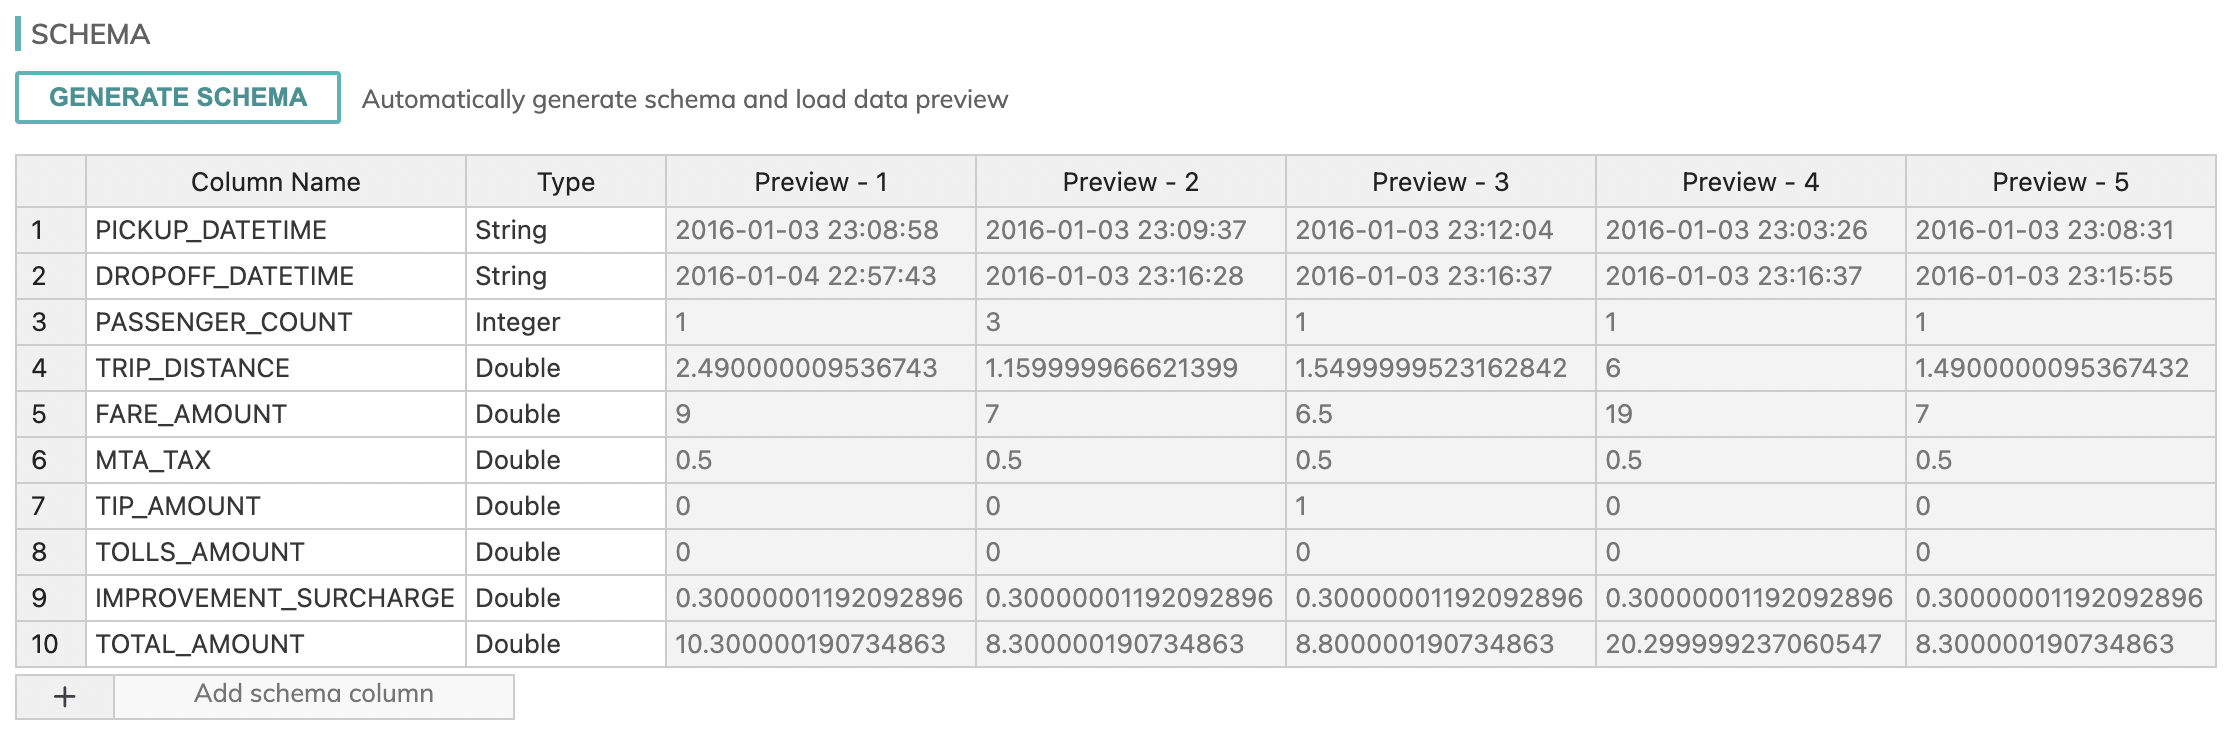
You should see the following schema after hitting the Generate Schema button:
With this, you should now have your read connectors for the Cabs dataflow!
Step 2: Create the Transforms
Next, we'll work with the CLEAN_YELLOW_CABS and CLEAN_GREEN_CABS data to create a set of transforms that will make the datasets compatible (note the schemas are slightly different!) and allow us to combine the data.
Create the AUGMENTED_GREEN_CABS Transform
From the CLEAN_GREEN_CABS read connector, left-select the vertical ellipsis and select Create new Transform. When the transform window opens, fill out the following fields with their corresponding values:
| Field | Value |
|---|---|
| NAME | AUGMENTED_GREEN_CABS |
| HOW WILL YOU SPECIFY THE TRANSFORM? | Snowflake SQL |
Once these options are filled out, you should now have an inline code editor available. There, the following code can be input:
SELECT
    c.*,
    'green' as cab_type,
    DATE_TRUNC('day', TO_TIMESTAMP(c.PICKUP_DATETIME)) AS pickup_date
FROM
    {{CLEAN_GREEN_CABS}} AS c
All other configurations can be left blank or as is.
Now, select CREATE and the transform will begin running your Snowflake SQL code.
Create the ALL_CABS Transform
From the AUGMENTED_GREEN_CABS transform, left-select the vertical ellipsis and select Create new Transform. As we did above, fill in the following fields and the code editor with their respective pieces of information:
| Field | Value |
|---|---|
| NAME | ALL_CABS |
| HOW WILL YOU SPECIFY THE TRANSFORM? | Snowflake SQL |
SELECT *
FROM {{AUGMENTED_GREEN_CABS}}

UNION ALL

SELECT *
FROM {{CLEAN_YELLOW_CABS}}
Select CREATE to finish the component.
Pipeline 2: Weather
Now we'll begin with creating the weather dataflow, where we'll be working with some weather data within the same S3 bucket. We'll transform the data within this dataflow then make it available for use in our Cabs dataflow via the use of a data share.
Step 0: Create the Dataflow
You'll need to create a new dataflow for this and can do so by navigating back to the environment's home page (left-click the Ascend.io icon on the top left to get there the quickest). Navigate back to the data service that contains your Cabs dataflow and hit the New Dataflow button above that data service and title it Weather.
Step 1: Create the Read Connector
As before, select Read Connector from the CREATE menu on the tool panel and select the S3 connection that points at the ascend-io-sample-data-read S3 bucket. Select USE and on the next screen, hit the Skip and Configure Manually option.
On the Connector Configuration screen, fill the following fields with their respective values:
| Field | Value |
|---|---|
| NAME | WEATHER |
| OBJECT PATTERN MATCHING | Prefix |
| OBJECT PATTERN | weather/sensor-by-day/ |
| PARSER | CSV |
| FILES HAVE A HEADER ROW | Check this box. |
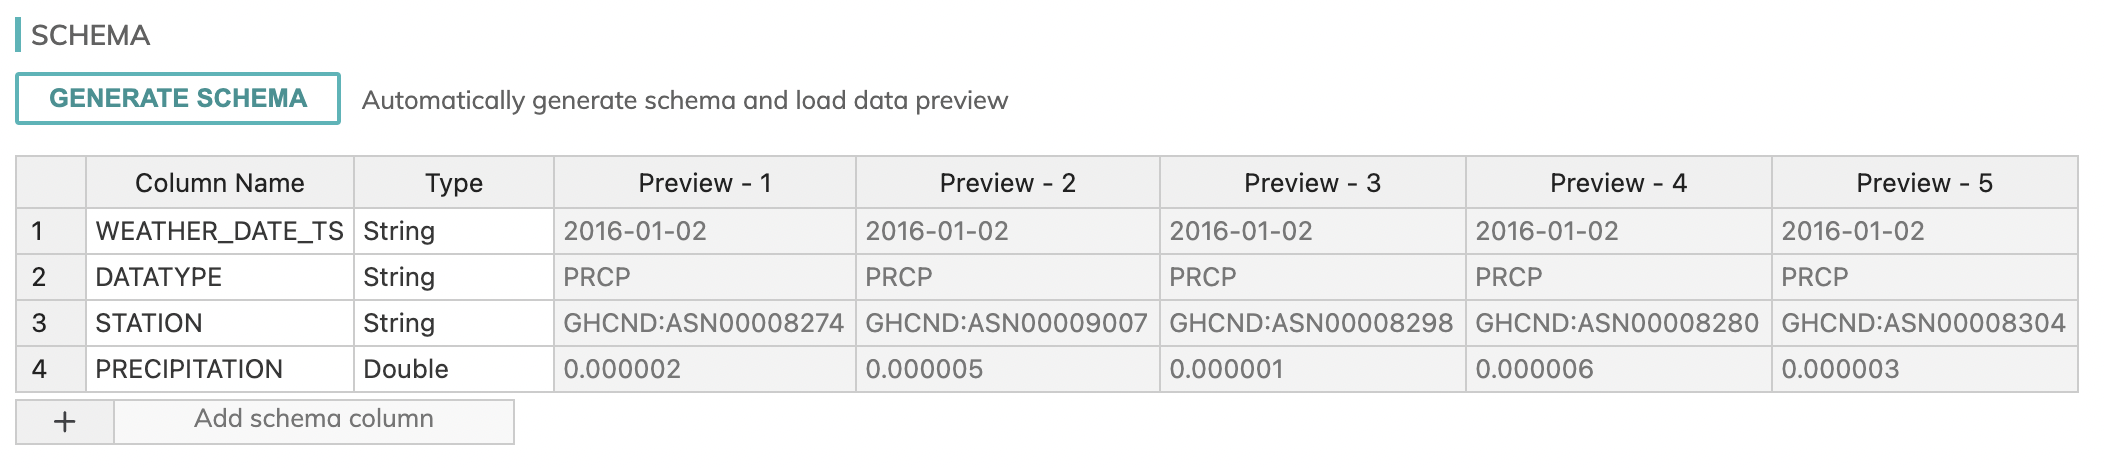
On hitting Generate Schema, you should get the following schema preview:
Step 2: Create the Transforms
Just as we did with the Cabs dataflow, we'll use some Snowflake SQL transforms to get the data to a state where we can use it for more advanced purposes.
Create the WEATHER_MAYBE_RAINY Transform
From the WEATHER read connector, left-select the vertical ellipsis and select Create new Transform. Fill out the following fields as such:
| Field | Value |
|---|---|
| NAME | WEATHER_MAYBE_RAINY |
| HOW WILL YOU SPECIFY THE TRANSFORM? | Snowflake SQL |
SELECT
    w.*,
    CASE
        WHEN w.PRECIPITATION > .1 THEN 'rainy'
        ELSE 'not rainy'
    END AS weather
FROM
    {{WEATHER}} AS w
Complete the component by selecting the CREATE button.
Create the RAINY_DAYS Transform
Downstream of the WEATHER_MAYBE_RAINY transform, create the following transform:
| Field | Value |
|---|---|
| NAME | RAINY_DAYS |
| HOW WILL YOU SPECIFY THE TRANSFORM? | Snowflake SQL |
SELECT
    a.*
FROM
    {{WEATHER_MAYBE_RAINY}} AS a
    INNER JOIN (
        SELECT
            MAX(b.PRECIPITATION) AS maxprecip,
            b.WEATHER_DATE_TS
        FROM
            {{WEATHER_MAYBE_RAINY}} AS b
        GROUP BY
            b.WEATHER_DATE_TS
    ) c ON a.PRECIPITATION = c.maxprecip
    AND a.WEATHER_DATE_TS = c.WEATHER_DATE_TS
Select CREATE.
Step 3: Create the Data Share
The data share will allow us to share the output from the RAINY_DAYS transform with other dataflows. In this case, since we need the data to be used in the Cabs dataflow, this works perfectly for us!
So from our RAINY_DAYS transform, left-select the vertical ellipsis and select Create new Data Share. In the data share window that will pop up, fill out the fields with this information:
| Field | Value |
|---|---|
| NAME | RAINY_DAYS_DATA_SHARE |
| UPSTREAM | RAINY_DAYS |
| PERMISSION SETTINGS | All Data Services can access this Data Share |
If your data share comes up to date, then you've officially got your Weather dataflow up and running!
Pipeline 3: Cabs Pt. 2
Now we'll wrap up our Cabs dataflow with some final transformations that will use the data we have in our Weather dataflow.
Step 1: Connect to the Data Share
First navigate back to the Cabs dataflow we were working with in the first part of this guide.
We're going to create the subscriber side of the RAINY_DAYS_DATE_SHARE so that we can get the info into our Cabs dataflow. To do this, select Connect to Data Share from the CREATE menu on the tool panel. Once the menu of all the data shares available to this dataflow pops up, select the option named RAINY_DAYS_DATA_SHARE and click the Subscribe button that will show up after selecting it, then hit CREATE.
Step 2: Create the Transforms
Create the RIDES_WITH_WEATHER Transform
This transform will join the data we took from the Weather dataflow with the combined dataset from our ALL_CABS transform.
Left-select the vertical ellipsis of ALL_CABS and select Create new Transform. Fill out the fields as such:
| Field | Value |
|---|---|
| NAME | RIDES_WITH_WEATHER |
| HOW WILL YOU SPECIFY THE TRANSFORM? | Snowflake SQL |
SELECT
  c.*,
  w.*
FROM
  {{ALL_CABS}} AS c
  INNER JOIN {{RAINY_DAYS_DATA_SHARE}} AS w
  ON c.PICKUP_DATE = w.WEATHER_DATE_TS
Create the TIP_ANALYSIS Transform
This will be the final transform in the dataflow, using Snowpark to perform some more complicated analysis. From your RIDES_WITH_WEATHER date, create a new transform and fill out the following fields:
| Field | Value |
|---|---|
| NAME | TIP_ANALYSIS |
| HOW WILL YOU SPECIFY THE TRANSFORM? | Snowpark |
| WHICH UPSTREAM DATASET WILL BE INPUT[0]? | RIDES_WITH_WEATHER |
| HOW WILL THE PARTITIONS BE HANDLED? | Reduce All Partitions to One |
from snowflake.snowpark.session import Session
from snowflake.snowpark.dataframe import DataFrame
from snowflake.snowpark.functions import *
from snowflake.snowpark.types import *
from typing import List

def transform(session: Session, inputs: List[DataFrame]) -> DataFrame:
    table = inputs[0]

    return table \
        .filter(table.tip_amount > 0) \
        .filter(table.fare_amount > 0) \
        .withColumn("tip_percentage", table.tip_amount*100/table.fare_amount) \
        .groupBy("passenger_count") \
        .agg(avg("tip_percentage").alias("avg_tip_percentage"))
Congrats, you have created a fully operational Snowpark dataflow in Ascend!
Updated 11 months ago