
Databricks Data Plane
Overview
Submit an environment request before continuingBefore creating a Databricks data plane, submit an environment request indicating which data plane you would like enabled. Chat with us through Intercom within Ascend, or file a support ticket by emailing [email protected]. Once your data plane is enabled, you'll receive confirmation your data plane is ready for set up.
Enterprise Security Users:
For AWS S3, please send us a VPC endpoint within your environment request.
For Azure, please include relevant subnet IDs.
Setting up a Databricks data plane is a four-step process. Within Databricks, first, create an all-purpose compute cluster. Second, create a SQL warehouse. Finally generate an access token. Once set up is complete within Databricks, create a new data service within Ascend to run on Databricks.
You’ll need advanced permissions in Databricks Data Science & Engineering and SQL warehouse. For more information on these permissions, see the Databricks requirements for SQL warehouses.
You'll also want a text editor open to temporarily record credentials, endpoints, and server host names when setting up Databricks. This information will be used to configure Ascend to run within Databricks.
Step 1: Create a Databricks all-purpose compute cluster
When creating an all-purpose compute cluster, follow the steps for using the Create button.
Use the following configuration settings:
| Parameter | Value | Required |
|---|---|---|
| Multi-node | Required | |
| Access mode | No isolation shared | Required |
| Databricks runtime version | 10.4 LTS (Scala 2.12, Spark 3.2.1) | Recommended |
| Worker type | i3.Xlarge | Recommended |
| Driver tyle | Same as worker | Recommended |
| Enable Auto Scaling | True | Required |
| Enable Auto Scaling local storage | False | Recommended |
| Terminate after __ minutes of inactivity | 30 | Recommended |
Under Advanced options, click Spark and copy/paste the following into the Spark config:
spark.databricks.delta.schema.autoMerge.enabled true
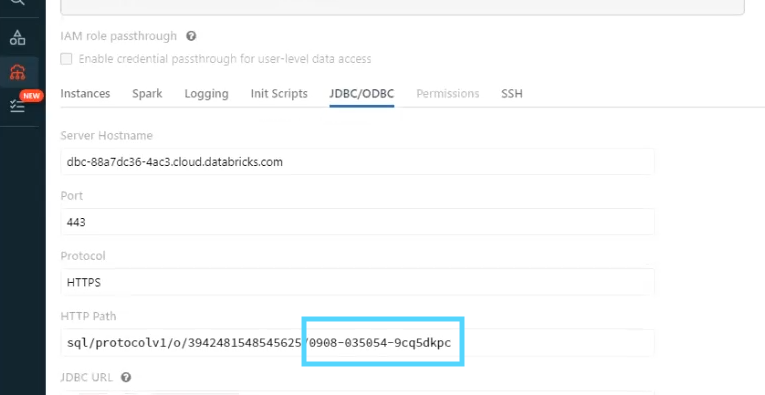
Record the following for later use:Once the cluster is created, select the compute cluster name. Under the Configuration tab, select Advanced Options. Select the JDBC/ODBC tab. Record the HTTP Path endpoint.
Step 2: Create a SQL warehouse
When creating an SQL warehouse, follow the steps provided by Databricks. Utilize your best practices standards for Name, Cluster size, and Scaling. We recommend setting Auto Stop to “30 minutes.” Under Advanced options, we recommend setting Spot instance policy to “Cost optimized”.
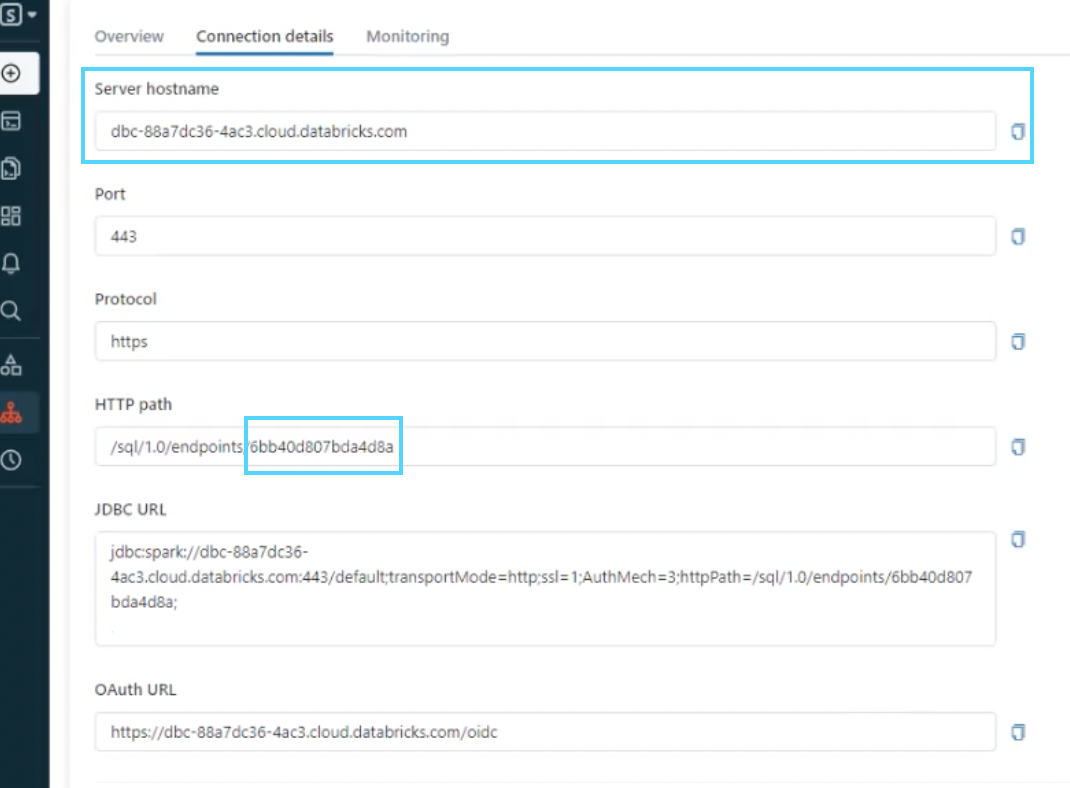
Record the following for later use:After the SQL warehouse is created, record the following information from Connection details for use within Ascend (see Figure 3):
- Server host name
- HTTP path endpoint
Step 3: Generate an access token for Ascend
Next, generate a personal access token. When setting the Lifetime, please remember this token will need to be renewed.
Record the following for later use:After the personal access token is generated, record immediately.
Step 4: Create a Databricks data service in Ascend
From your Ascend dashboard, select** +New Data Service**.
Enter a name and description, and select CREATE.
Data service settings
After creating the data service, select it from dashboard.
Next, select Connections. Use the following settings:
| Parameter | Value |
|---|---|
| Connection Name | DBX_NAME |
| Connection Type | Databricks |
| Access Type | Read-Write |
| Server Host Name | Paste recorded Databricks SQL Warehouse server host name |
| Execution Context for SQL Work | Use a Databricks SQL Endpoint |
| Endpoint ID | Paste recorded Databricks SQL Warehouse HTTP path endpoint |
| Execution Context for Non-SQL Work (e.g. PySpark transforms) | Use an all-purpose Databricks Cluster |
| Cluster ID | Paste recorded Databricks cluster JDBC/ODBC endpoint |
Check Required Credentials.
- Select Create a new credential from the drop-down menu.
- Assign a credential name.
- Paste the recorded Access Token from Step 3 and select CREATE.
Data plane configuration
- In the left menu, select Data Plane Configuration.
- Select the newly create Databricks Connection from the drop-down menu.
- Select Update.
Creating Dataflows and Connectors
Once the data plane is configured, you can begin creating data flows. Create Read Connectors for Databricks utilizing the previously configured connection.
Updated 11 months ago