
Dataflow Tutorial - Building a Simple Dataflow
Introduction
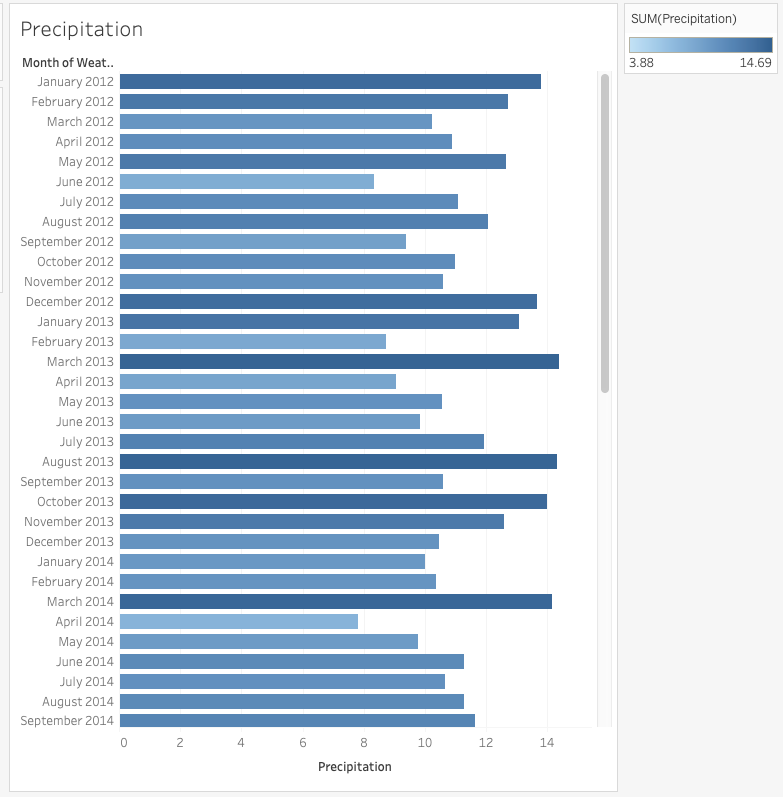
In this dataflow tutorial, we will be walking you through building your first Dataflow using a Read Connector, a Transform, and a Data Feed. We'll be using publicly available NYC weather data as our sample data. It contains monthly data from 2012 to 2017, for a weather station in central park. It contains for each day the weather (e.g. cloudy, rainy, sunny, pouring) and the level of precipitation as our sample data. So, let’s get started…
Important!In order to follow along with this tutorial, you should either have your own Ascend environment (paid account) or a free trial version. Go here to request a trial of the Ascend platform.
Create a Dataflow
Dataflows are continuously running data pipelines. You design a Dataflow with a combination of declarative configurations, SQL, and Python. As you design Dataflows, you are creating a blueprint that is sent to the Ascend Dataflow Control Plane to be automated. For this tutorial, you will create a new Dataflow within your Data Service.
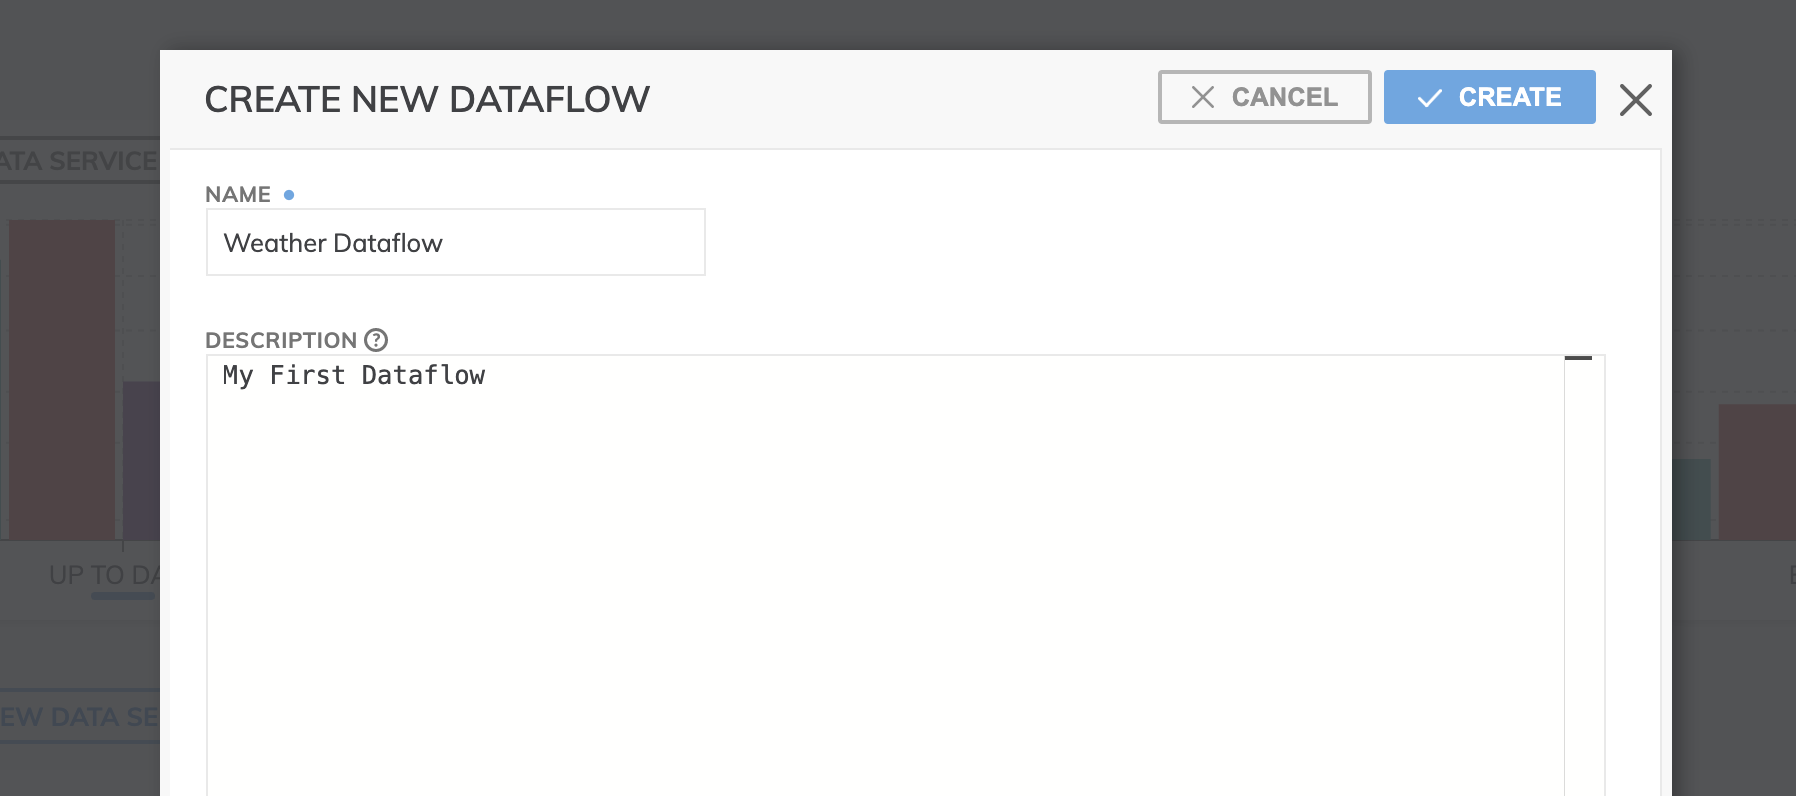
- Create a new Dataflow called Weather Dataflow by clicking the + NEW DATAFLOW button (shown below) next to your Data service and provide an optional brief description. Click CREATE and you've instantly created your Dataflow.

Dataflow Overview
Once inside the Dataflow canvas, we can explore some of the essential things (e.g. menus and options) you'll need to be familiar with before we move on.
- The dashboard icon will take you back to the system dashboard.
- The Data Service menu will show you a list of all data services that you can quickly jump to along with being able to manage various settings and permissions.
- The Dataflow menu allows settings and permissions configuration for this Dataflow or others within this data service.
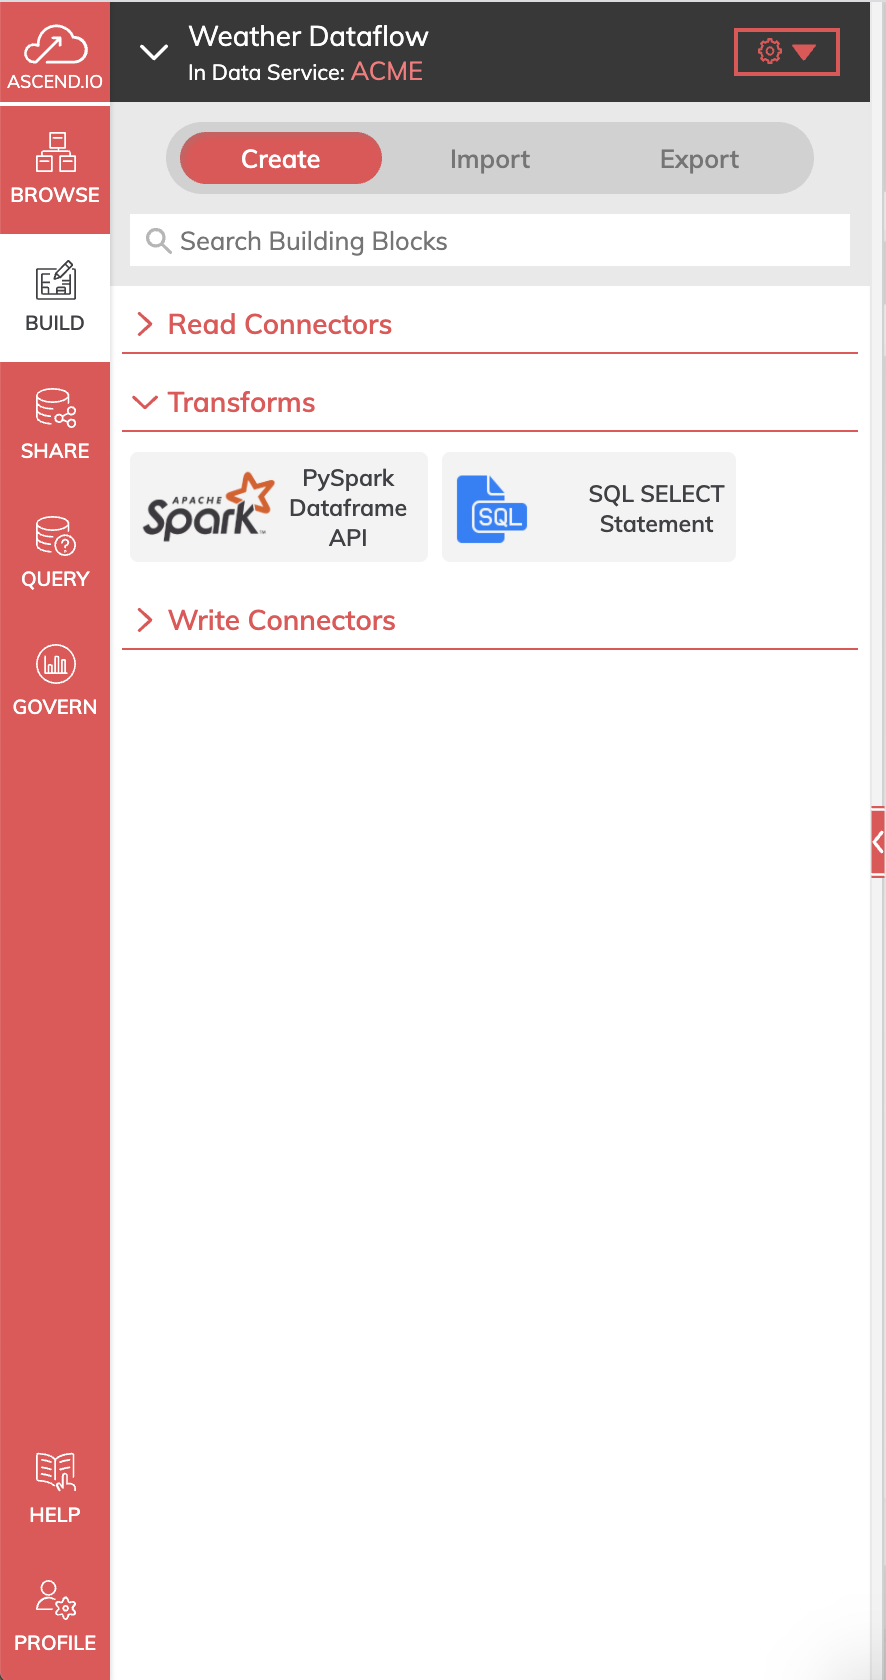
- The Add menu is what you’ll be using most of the time and it’s from there where you can create new read & write connectors, transforms, data feeds and the grouping of components for better Dataflow visibility.
- The Import and Export allow saving and exporting versions of your Dataflow so it can be copied and redeployed in a different data service or for versioning.
- The other tabs show Dataflow profiling information and the ability to perform a quick on-demand query, much as you would an ad-hoc query into your data warehouse.
- On the far right-hand of the screen, you’ll see a link to our on-line docs complete with a public discussion board and a drop-down menu underneath your login name for other settings.

Creating a Read Connector
The first step in our Dataflow is to create a Read Connector that accesses the weather data. Read Connectors allow Ascend to access any data from any source with any format.
Create "Weather" Read Connector
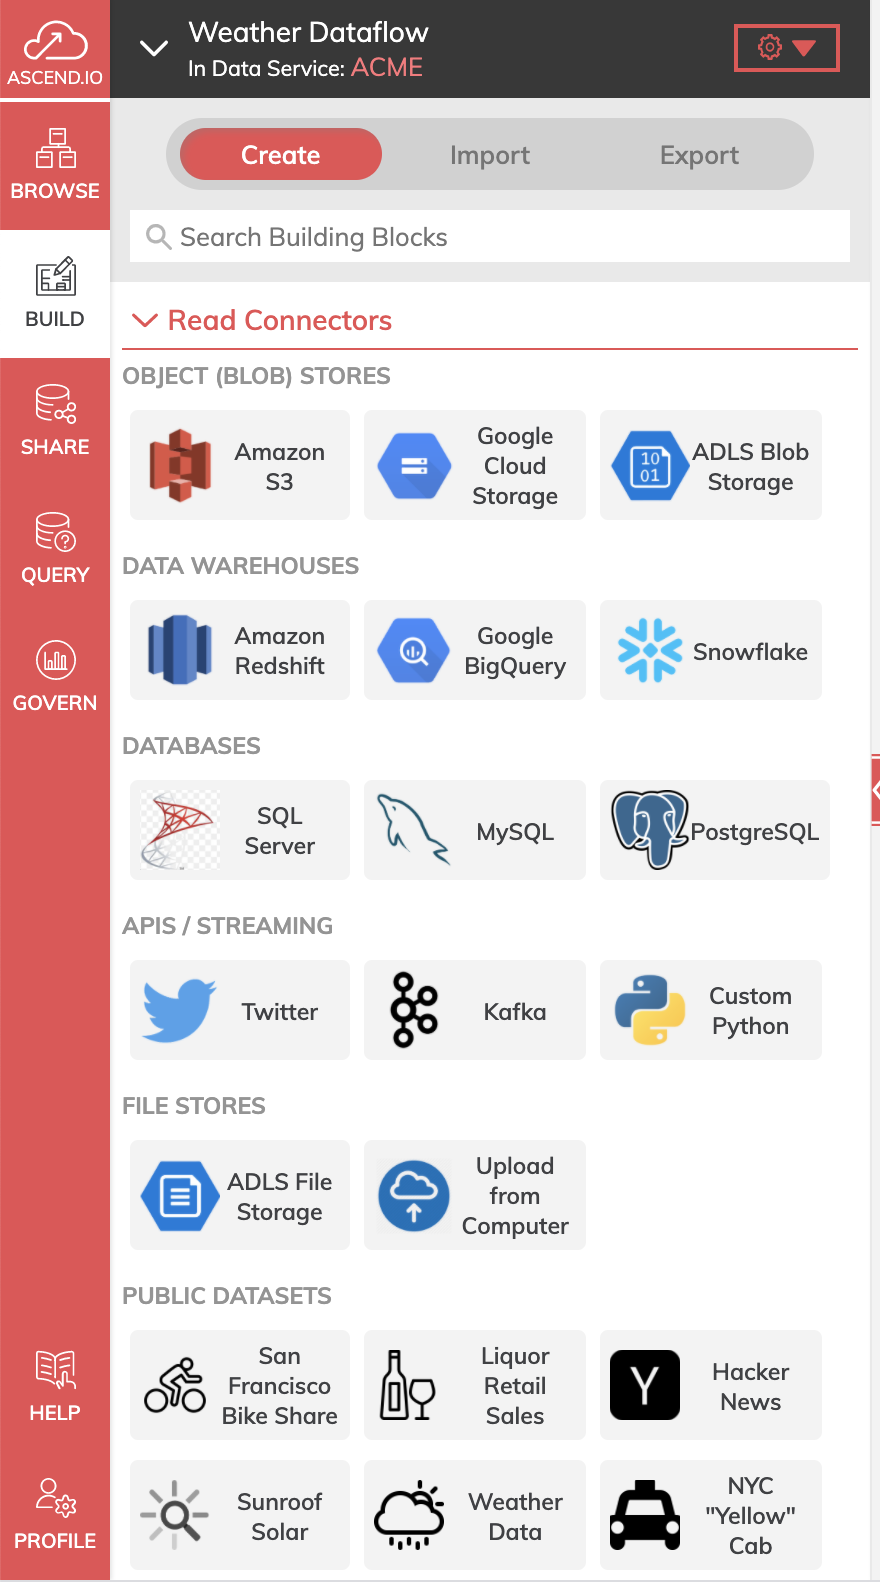
- In the Sidebar navigation panel, click BUILD to bring up the Connectors panel. From the Connectors Panel you'll get a list of all possible pre-built connectors to choose from. You can also easily build your own custom connector.

The Connectors panel displays a variety of Read Connectors supported by Ascend.
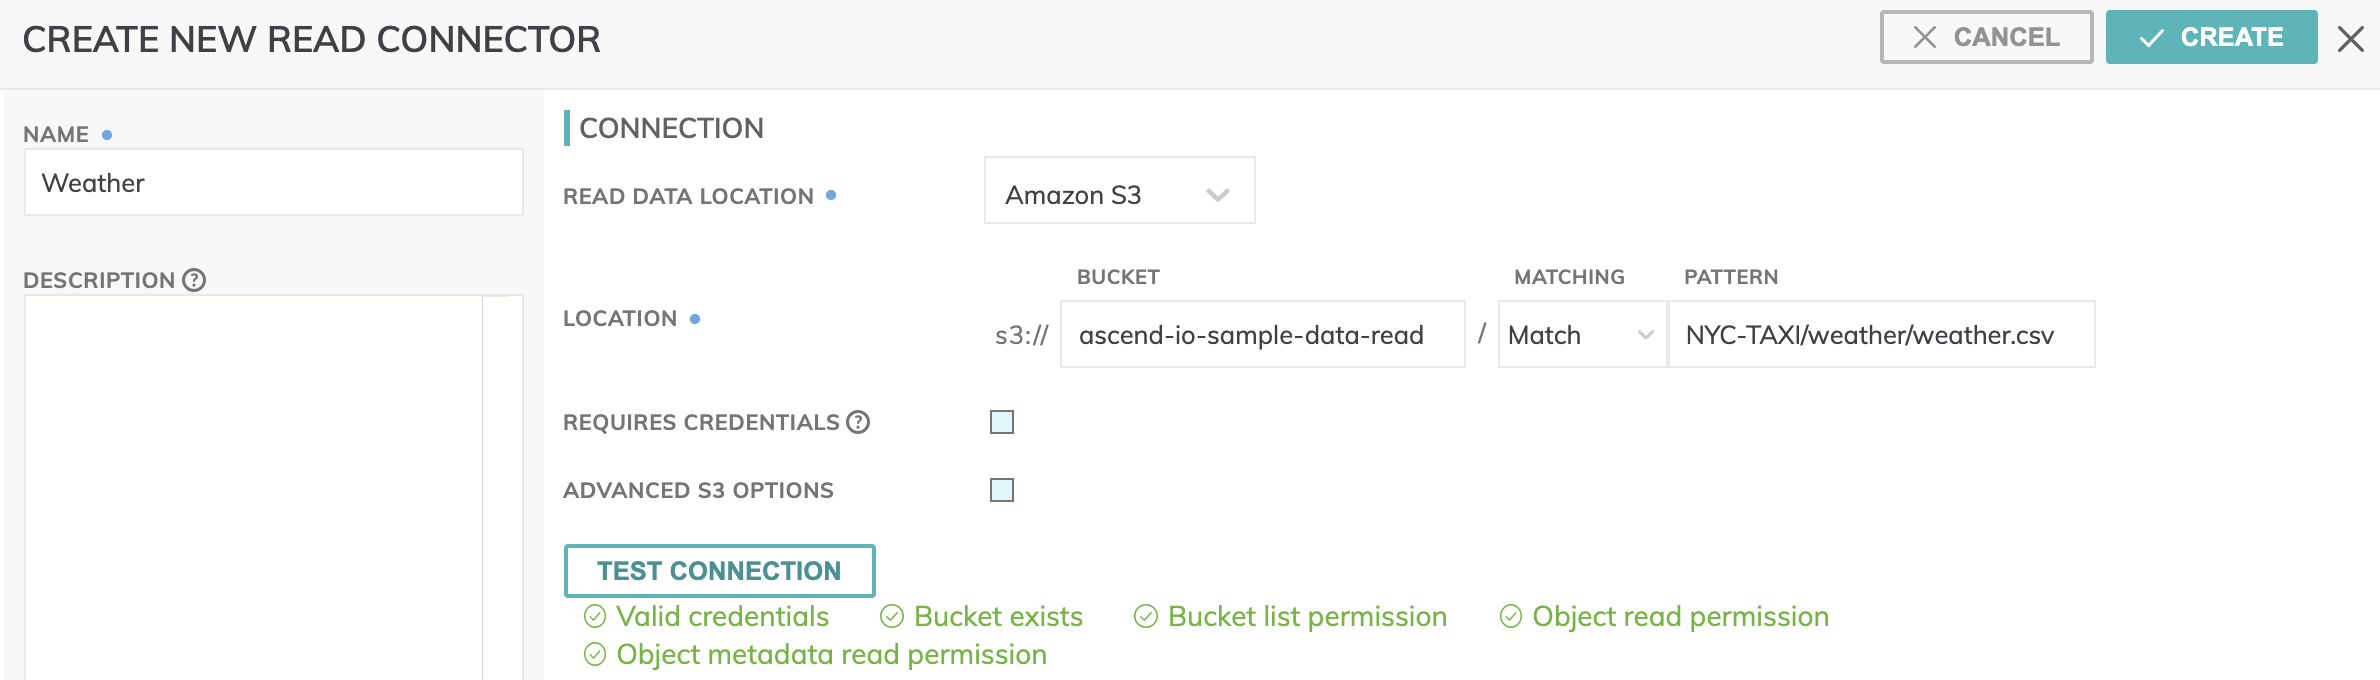
- For this dataflow tutorial, we will be connecting to an AWS S3 source so select the S3 Read Connector by clicking on the Amazon S3 icon. This will bring up the CREATE NEW READ CONNECTOR screen (shown below).
- Create the name of the connector as Weather and optionally provide a description.
- For Location enter the following:
- Enter ascend-io-sample-data-read as the bucket name.
- Select Match under Matching and enter NYC-TAXI/weather/weather.csv as the pattern.
- Uncheck the Requires Credentials checkbox.
- Use TEST CONNECTION to check whether all S3 bucket settings and permissions are properly and correctly configured.
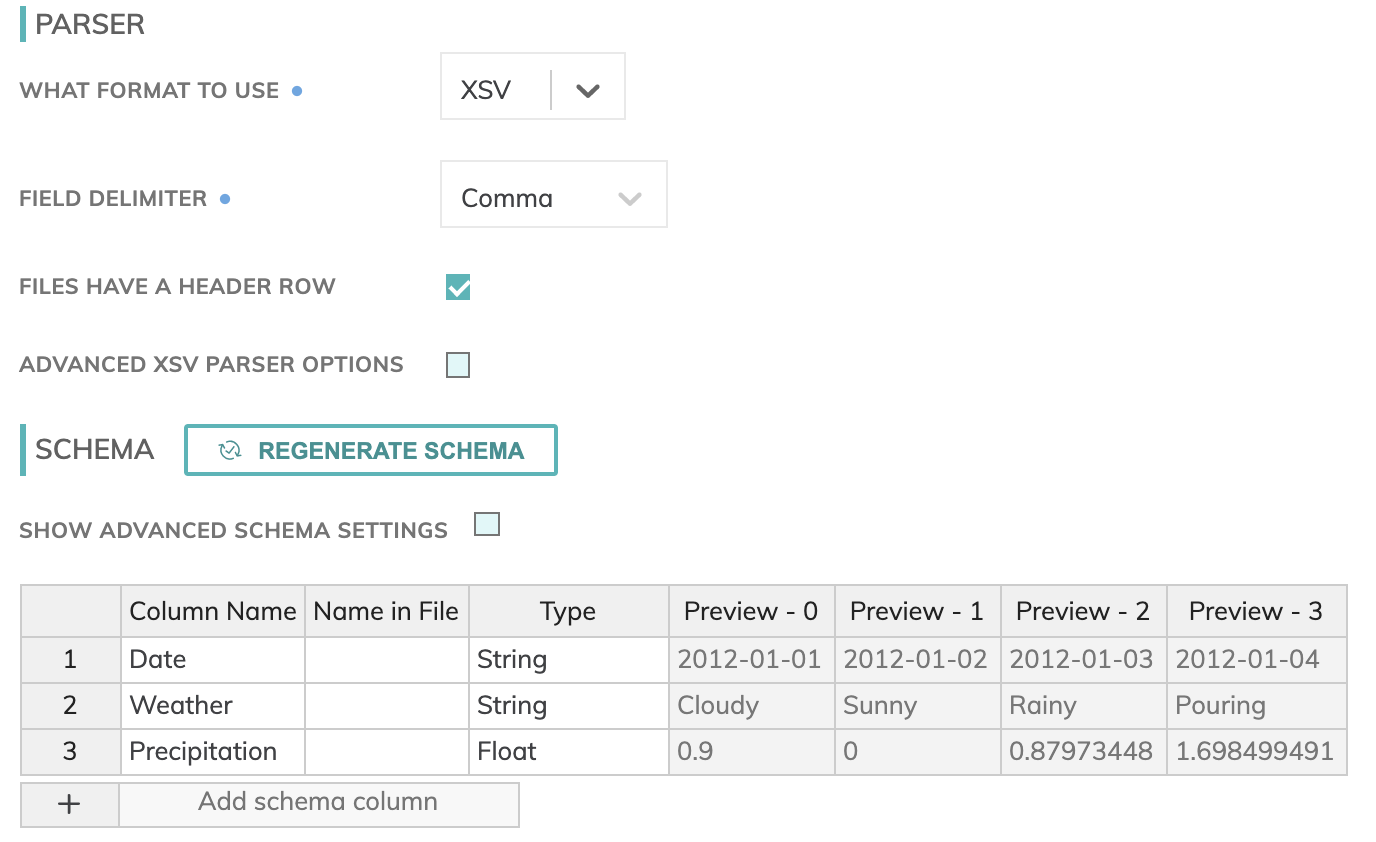
- For Parser Settings enter the following:
- Select XSV as the FORMAT TO USE
- Select Comma as the FIELD DELIMITER
- For HEADER ROW check the Files have a header row checkbox.
You will see a preview of your XSV to confirm everything looks accurate (as shown below)
- Finish and Preview
Leave the remaining fields at their default values and Click the CREATE button to create the connector and have Ascend ingest and parse it into your Dataflow.

When it's complete you should see the Read Connector on your Dataflow canvas (as shown below).

Creating a Transform
As soon as you have one or more read connectors (or data feed) you can start creating Ascend Transforms to do things like cleaning, filtering, joining and aggregating your data using SQL. Additionally, you can specify PySpark functions for specific compute and machine learning model training purposes.
Create "Weather" Transform
We need to do some cleanup and prep on our Weather dataset that we just ingested. Specifically, changing some column heading names, TIMESTAMP formatting, and filtering out all records that have no precipitation. Let's do that using some SQL code in a Transform.
- Click BUILD in the sidebar menu and select Transform from there. This will bring up the CREATE NEW TRANSFORM screen (shown below). Alternatively, you can create the new Transform by right-clicking the Weather Read Connector and selecting Create new transform from the drop-down menu.
- Create the name of the connector as Weather transform and optionally provide a description.

- Select the Query Type based on the type of Transform you're building. In this part of the tutorial, we're going to use SQL code to do the cleanup so we'll be selecting SQL*. Alternatively, if you wanted to create a PySpark or Scala function you could do that here as well by selecting PySpark orScala**.
- Selecting SQL will provide you with a simple SELECT statement as boilerplate, but we'll be adding editing this. To do that we'll be using the RAW BUILDER option which provides a rich editing experience and suggestions with autocomplete. Alternatively, you may use the QUERY BUILDER which offers a GUI-based, wizard-driven approach for those with novice SQL skills.
- Enter the following code into the RAW BUILDER editor.
SELECT
  ww.Date,
  ww.Weather,
  ww.Precipitation AS precipitation,
  TIMESTAMP(ww.Date) AS weather_date_ts
FROM Weather AS ww
WHERE LENGTH(TRIM(ww.Precipitation)) !=0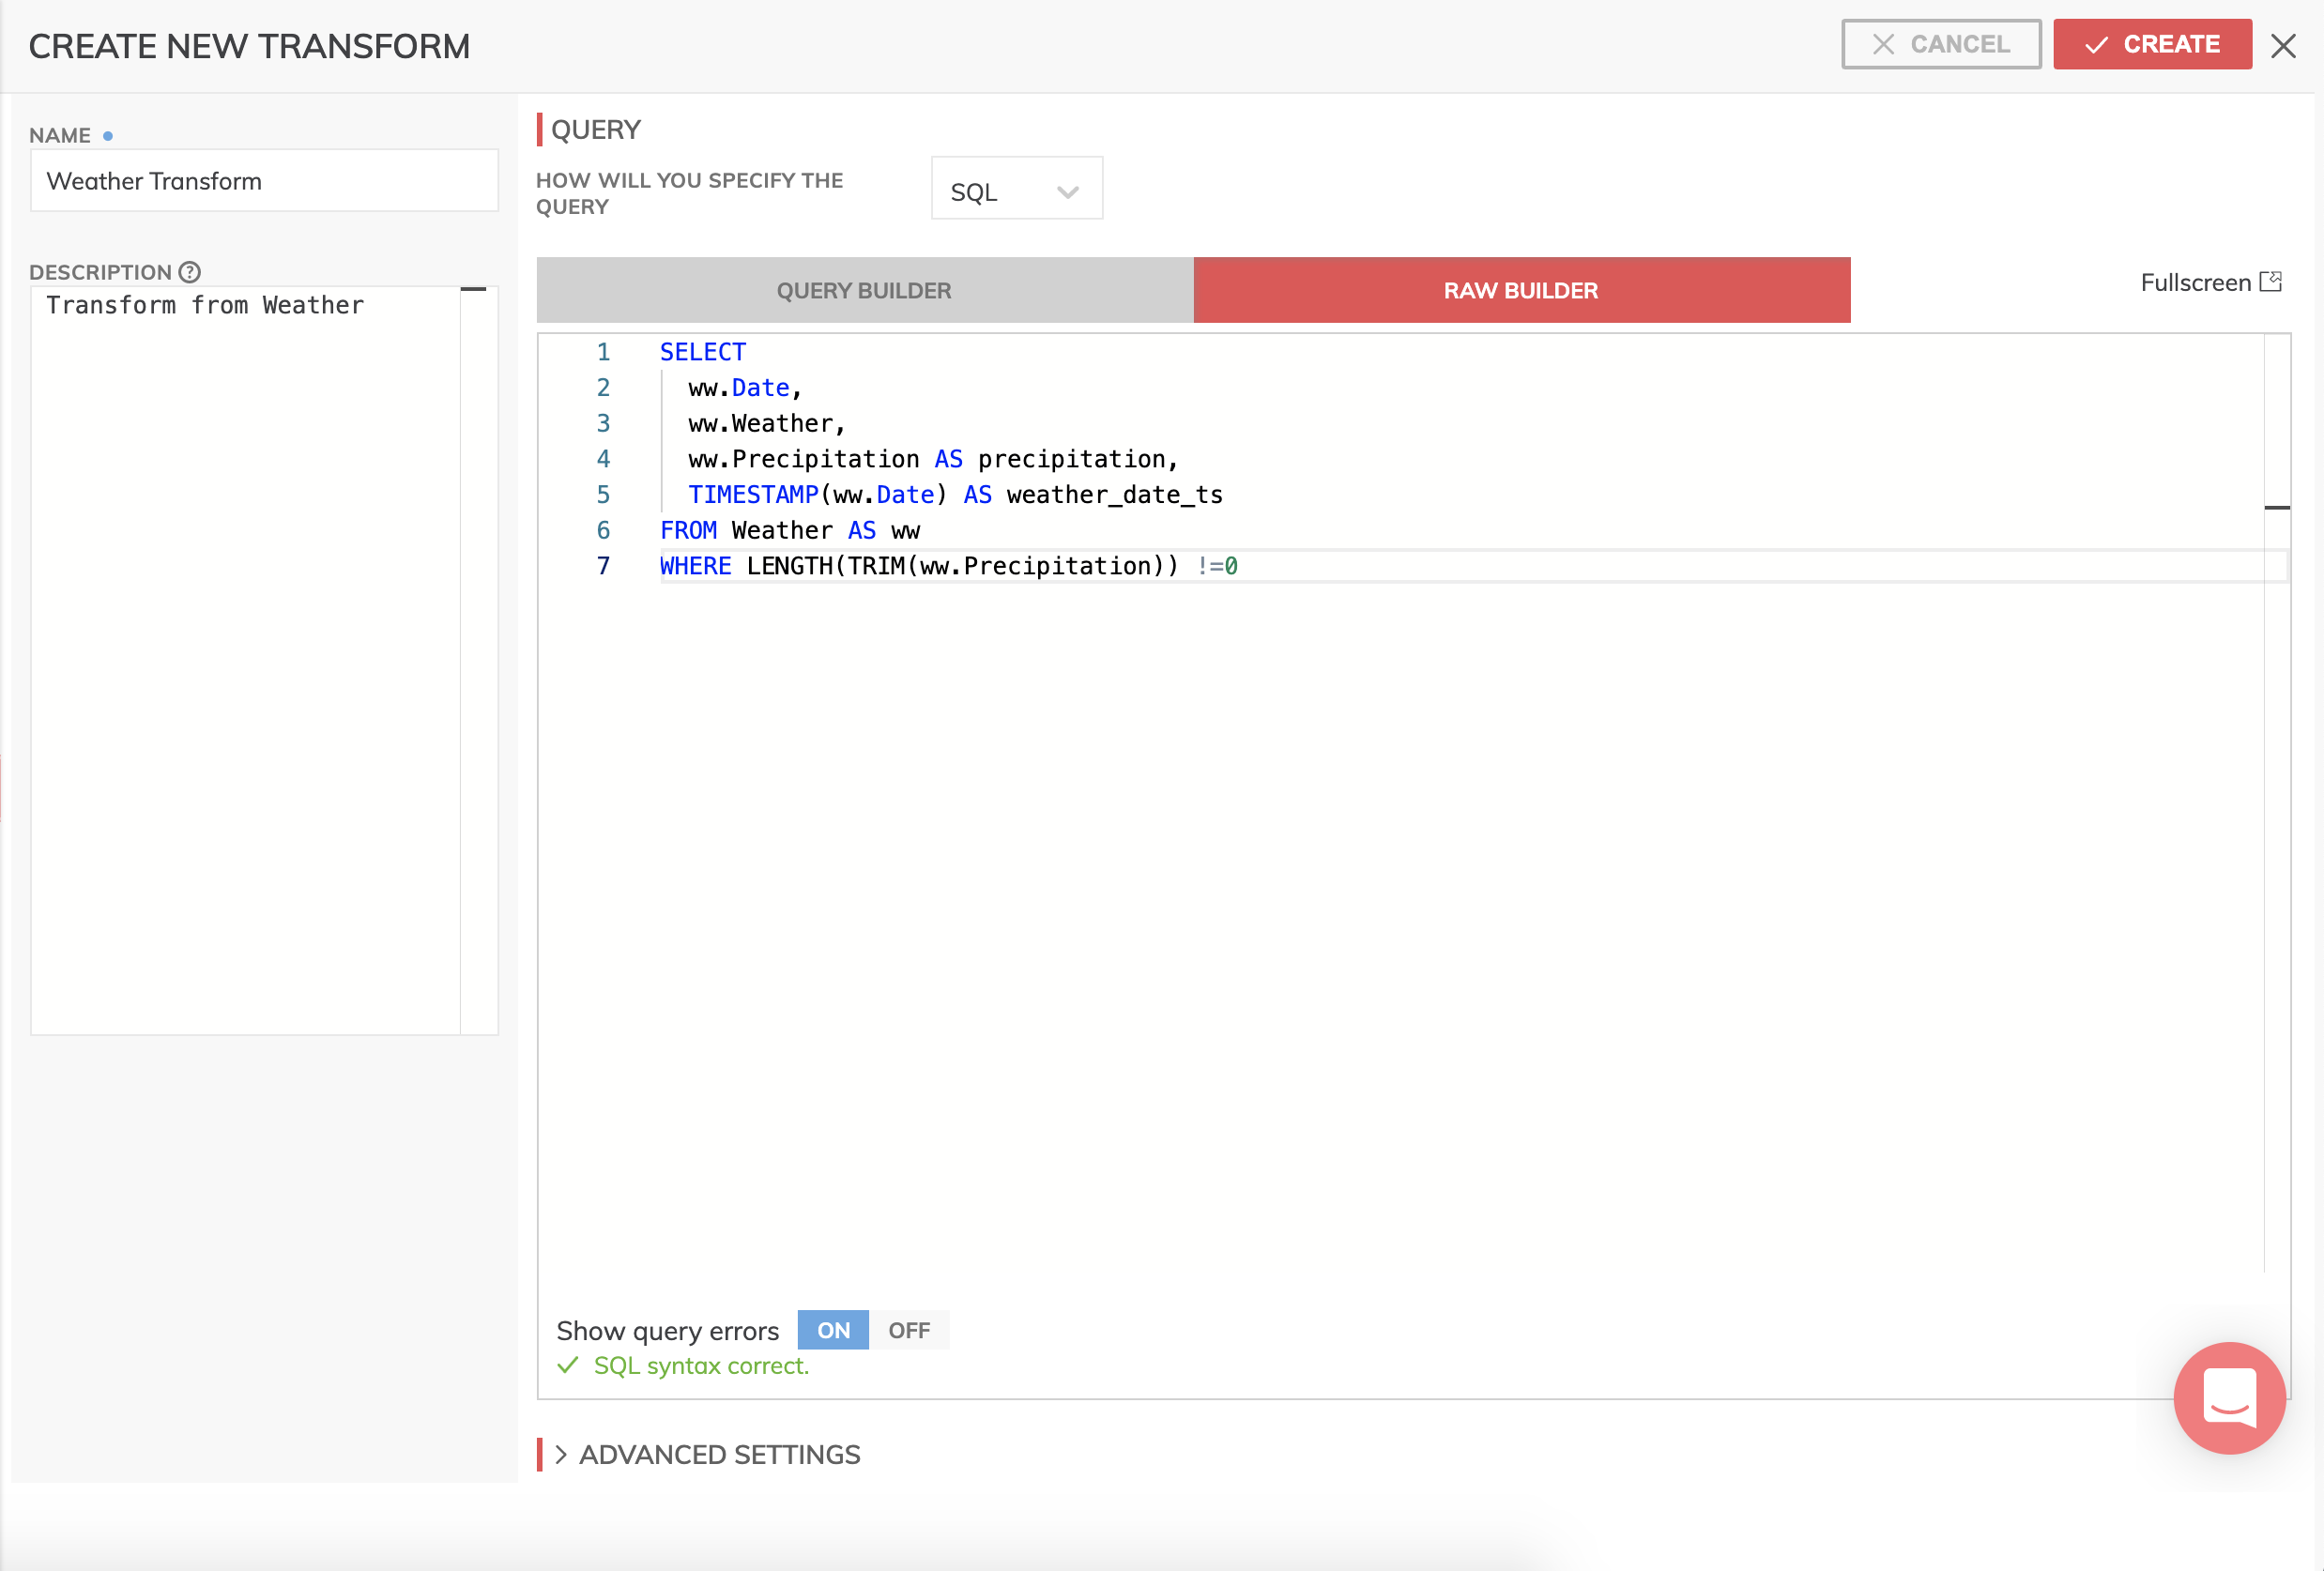
- Leave the remaining fields at their default values and click the CREATE button and Ascend will begin processing your SQL query immediately. When it's finished your Dataflow canvas should look like this.

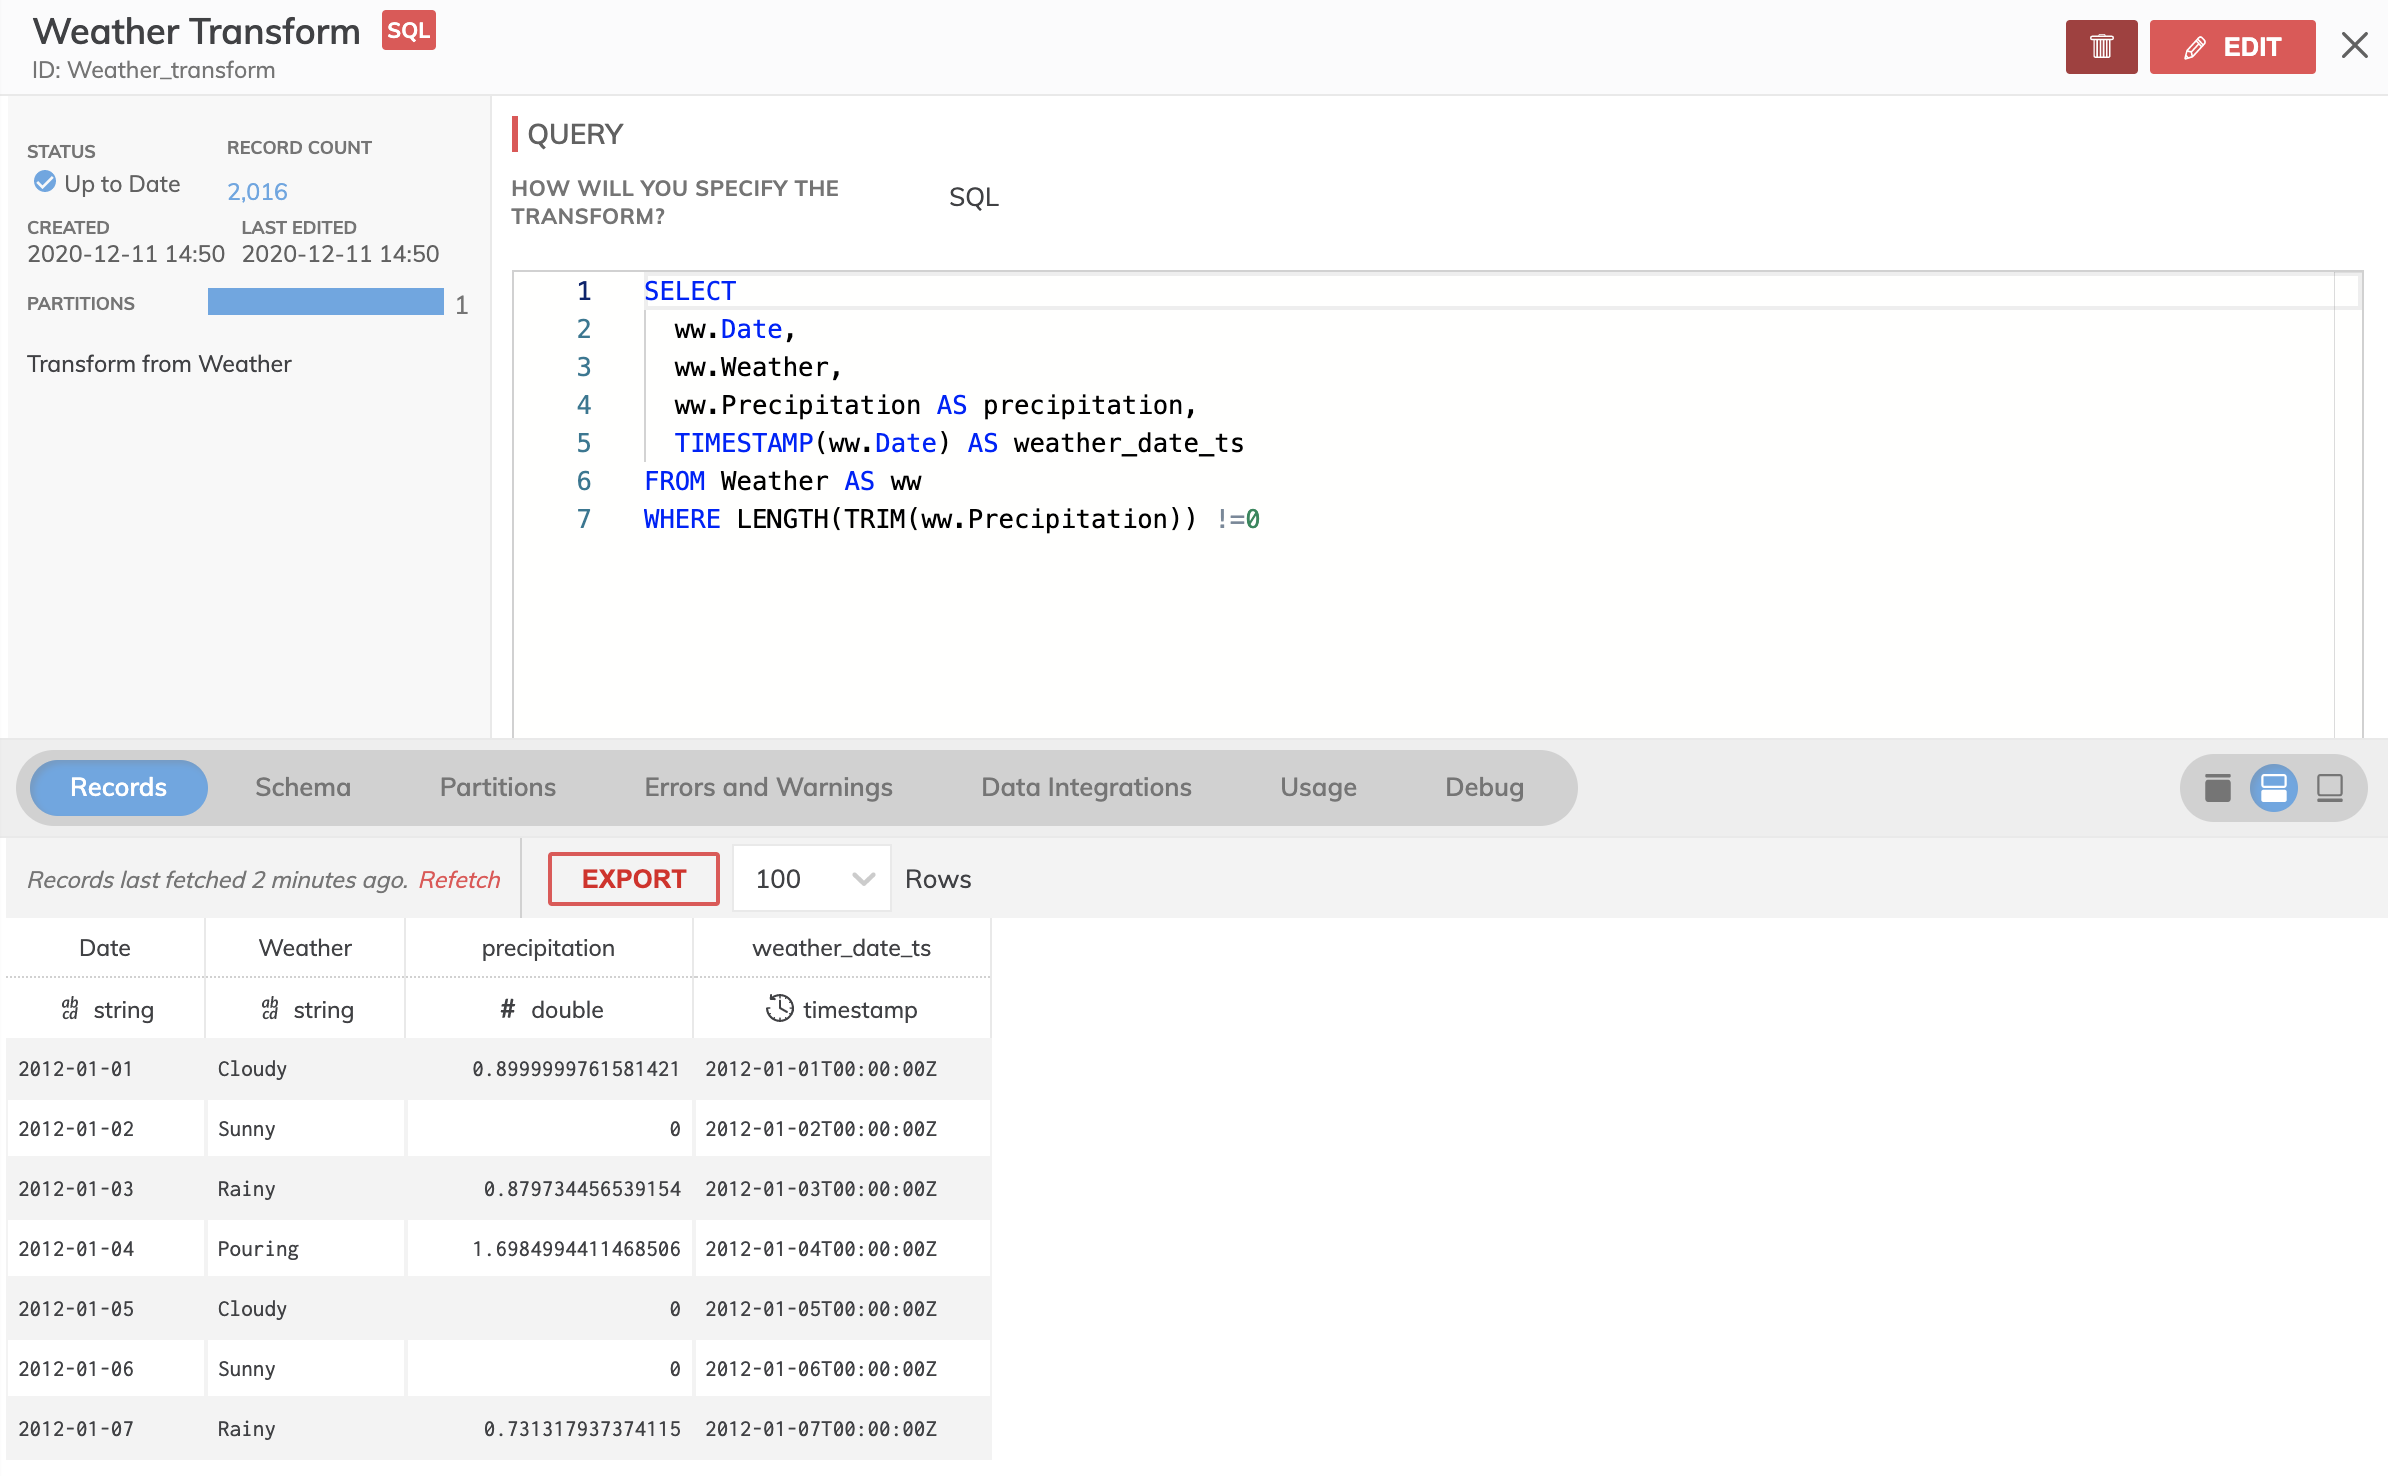
- Preview and inspect the results of the Transform by clicking on it and then clicking on the Records tab to view the contents. Click on the Expand icon to see Records, Schema, Partitions, Errors and Warnings, Data Integrations, Usage, and Debug. Partitions tab will show information on column stats and job details like elapsed time, etc. If any errors are detected you can click on the Errors and Warnings tab to view them.
Creating a Data Feed Connector
The final step in our Dataflow is to create a Data Feed. Data feeds are powerful constructs designed to allow Dataflows and Data Services to communicate live data with each other. This allows you to create very complex Dataflows that outputs a single result table and share it with others in your organization (say, in a different Data Service) without having to give them access to your actual Dataflow. You connect to existing Data Feed Connectors to act as inputs into other Dataflows.
Create "Weather Data" Data Feed Connector
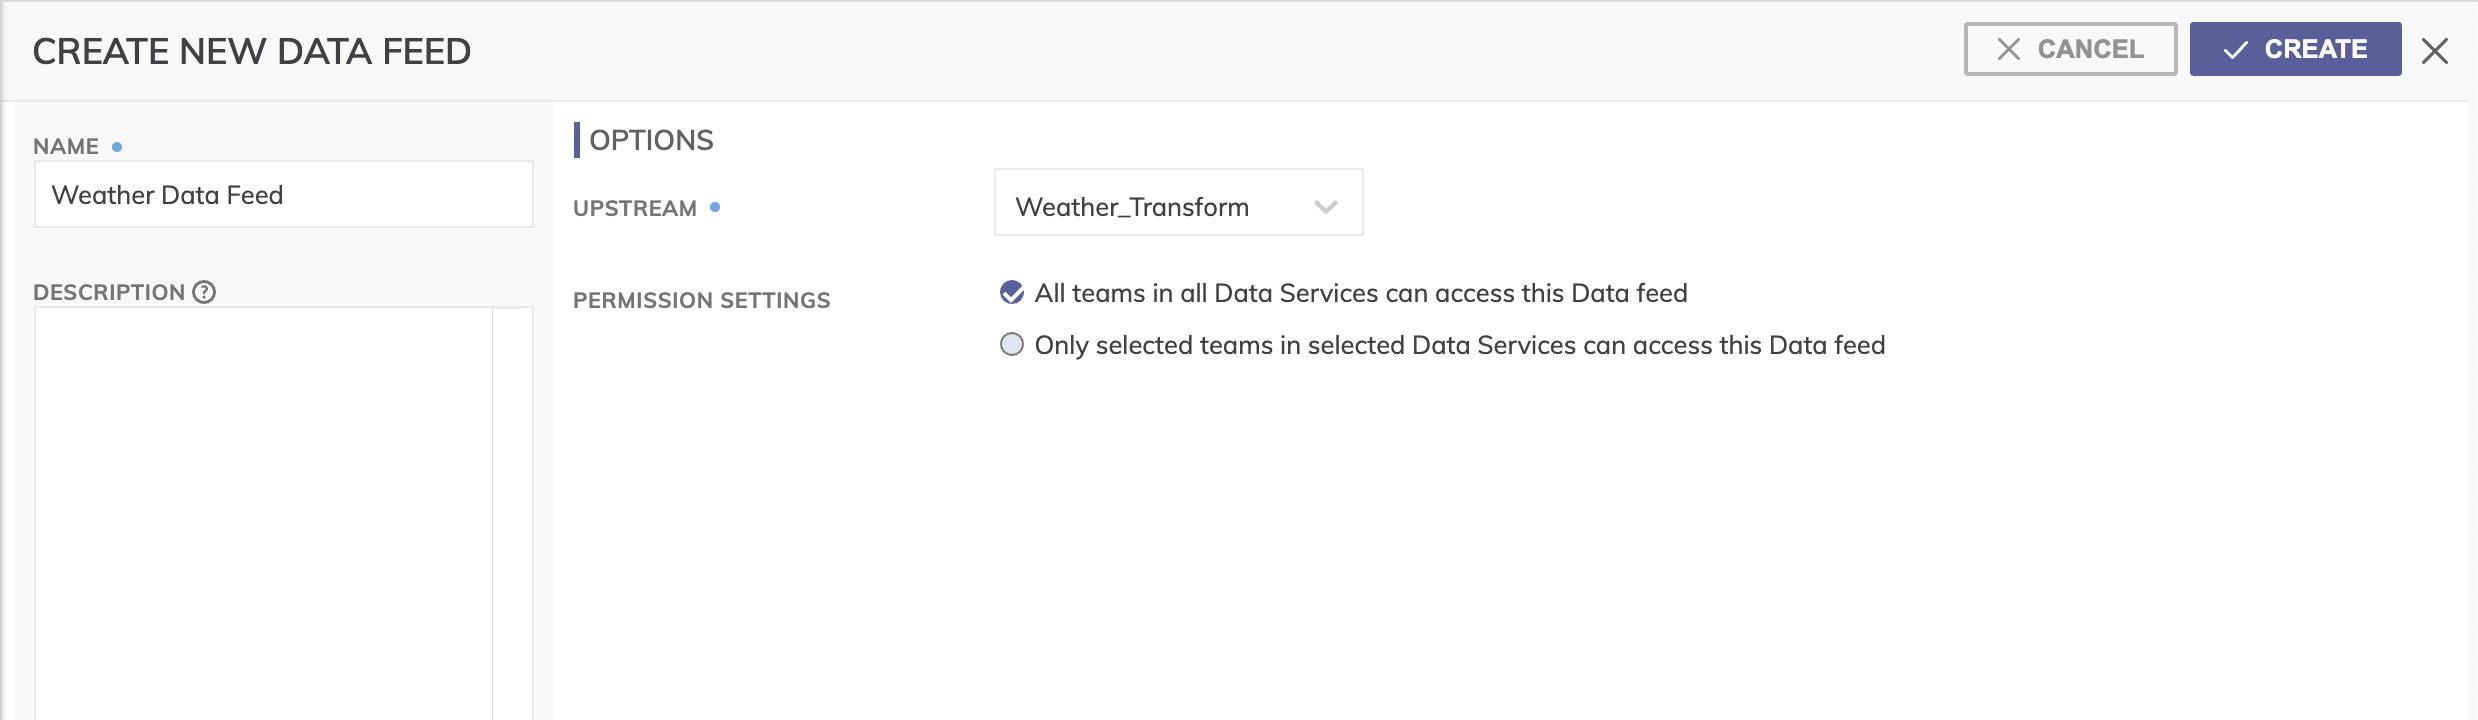
- To create the new Data Feed Connector click SHARE on the sidebar menu and click + NEW DATA FEED (shown below). Alternatively, you can create the new Data Feed Connector by right-clicking the Weather Transform and selecting Create new data feed from the drop-down menu.
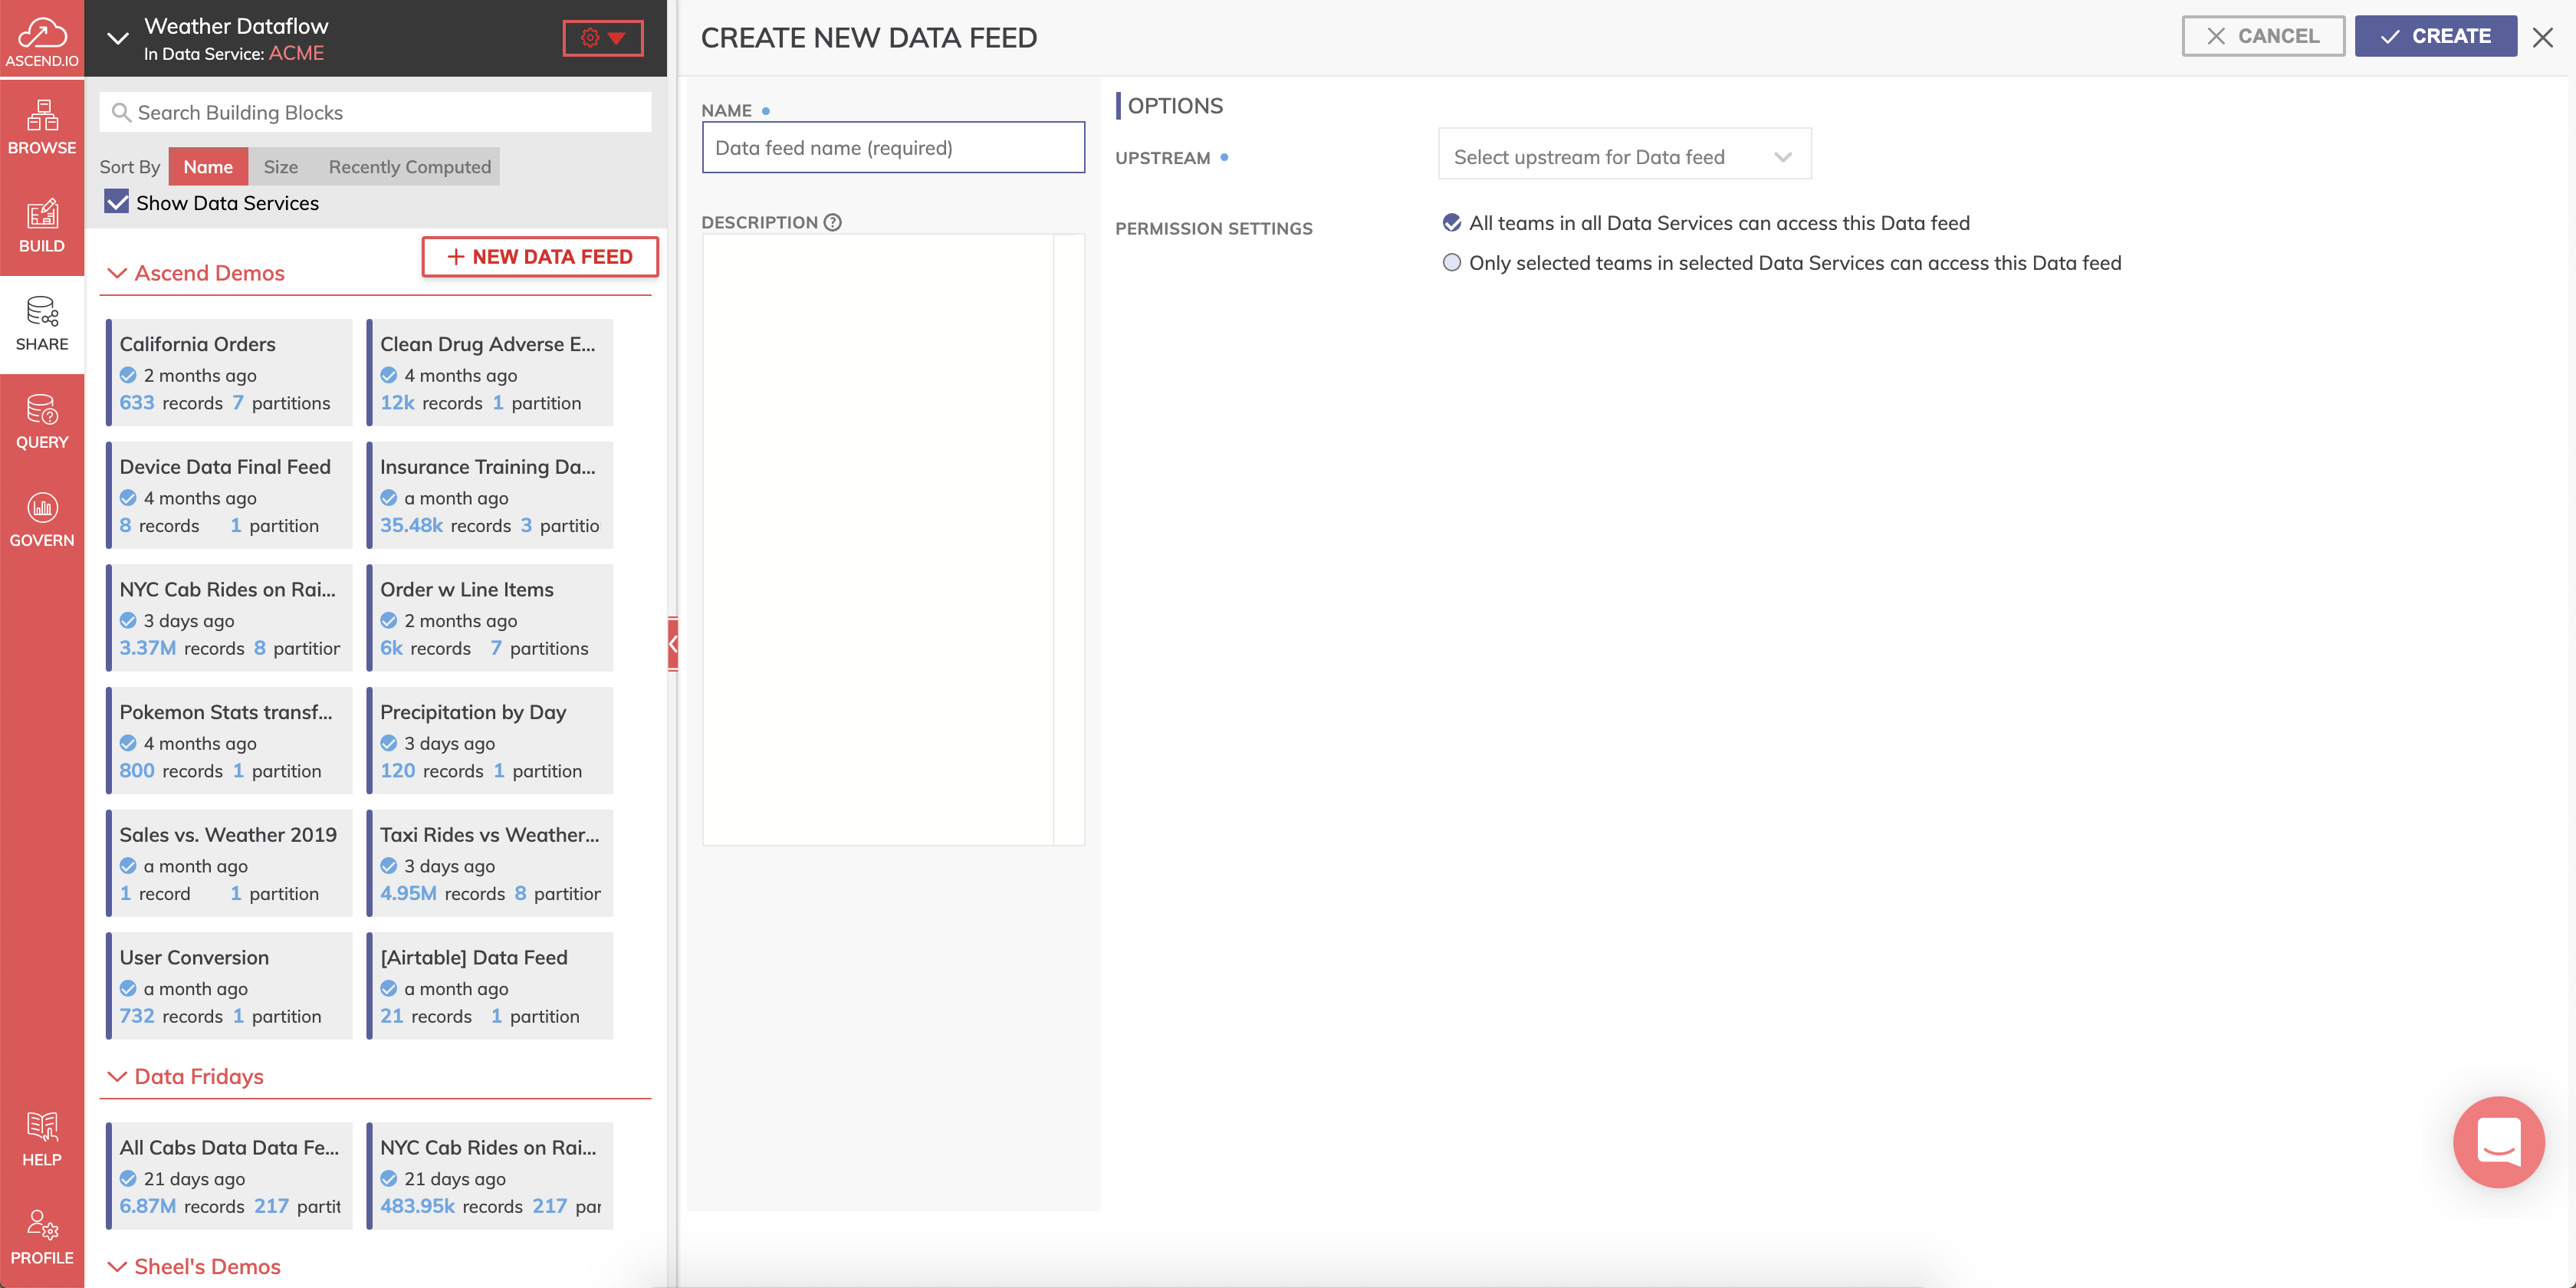
- Create the name of the Data Feed Connector as Weather Data Feed and optionally provide a description.
- Select **Weather Transform" from the UPSTREAM drop-down menu.
- For PERMISSION SETTINGS Leave the default "All teams in all Data Services can access this Data feed" selected. This will make it available to all users in our environment.
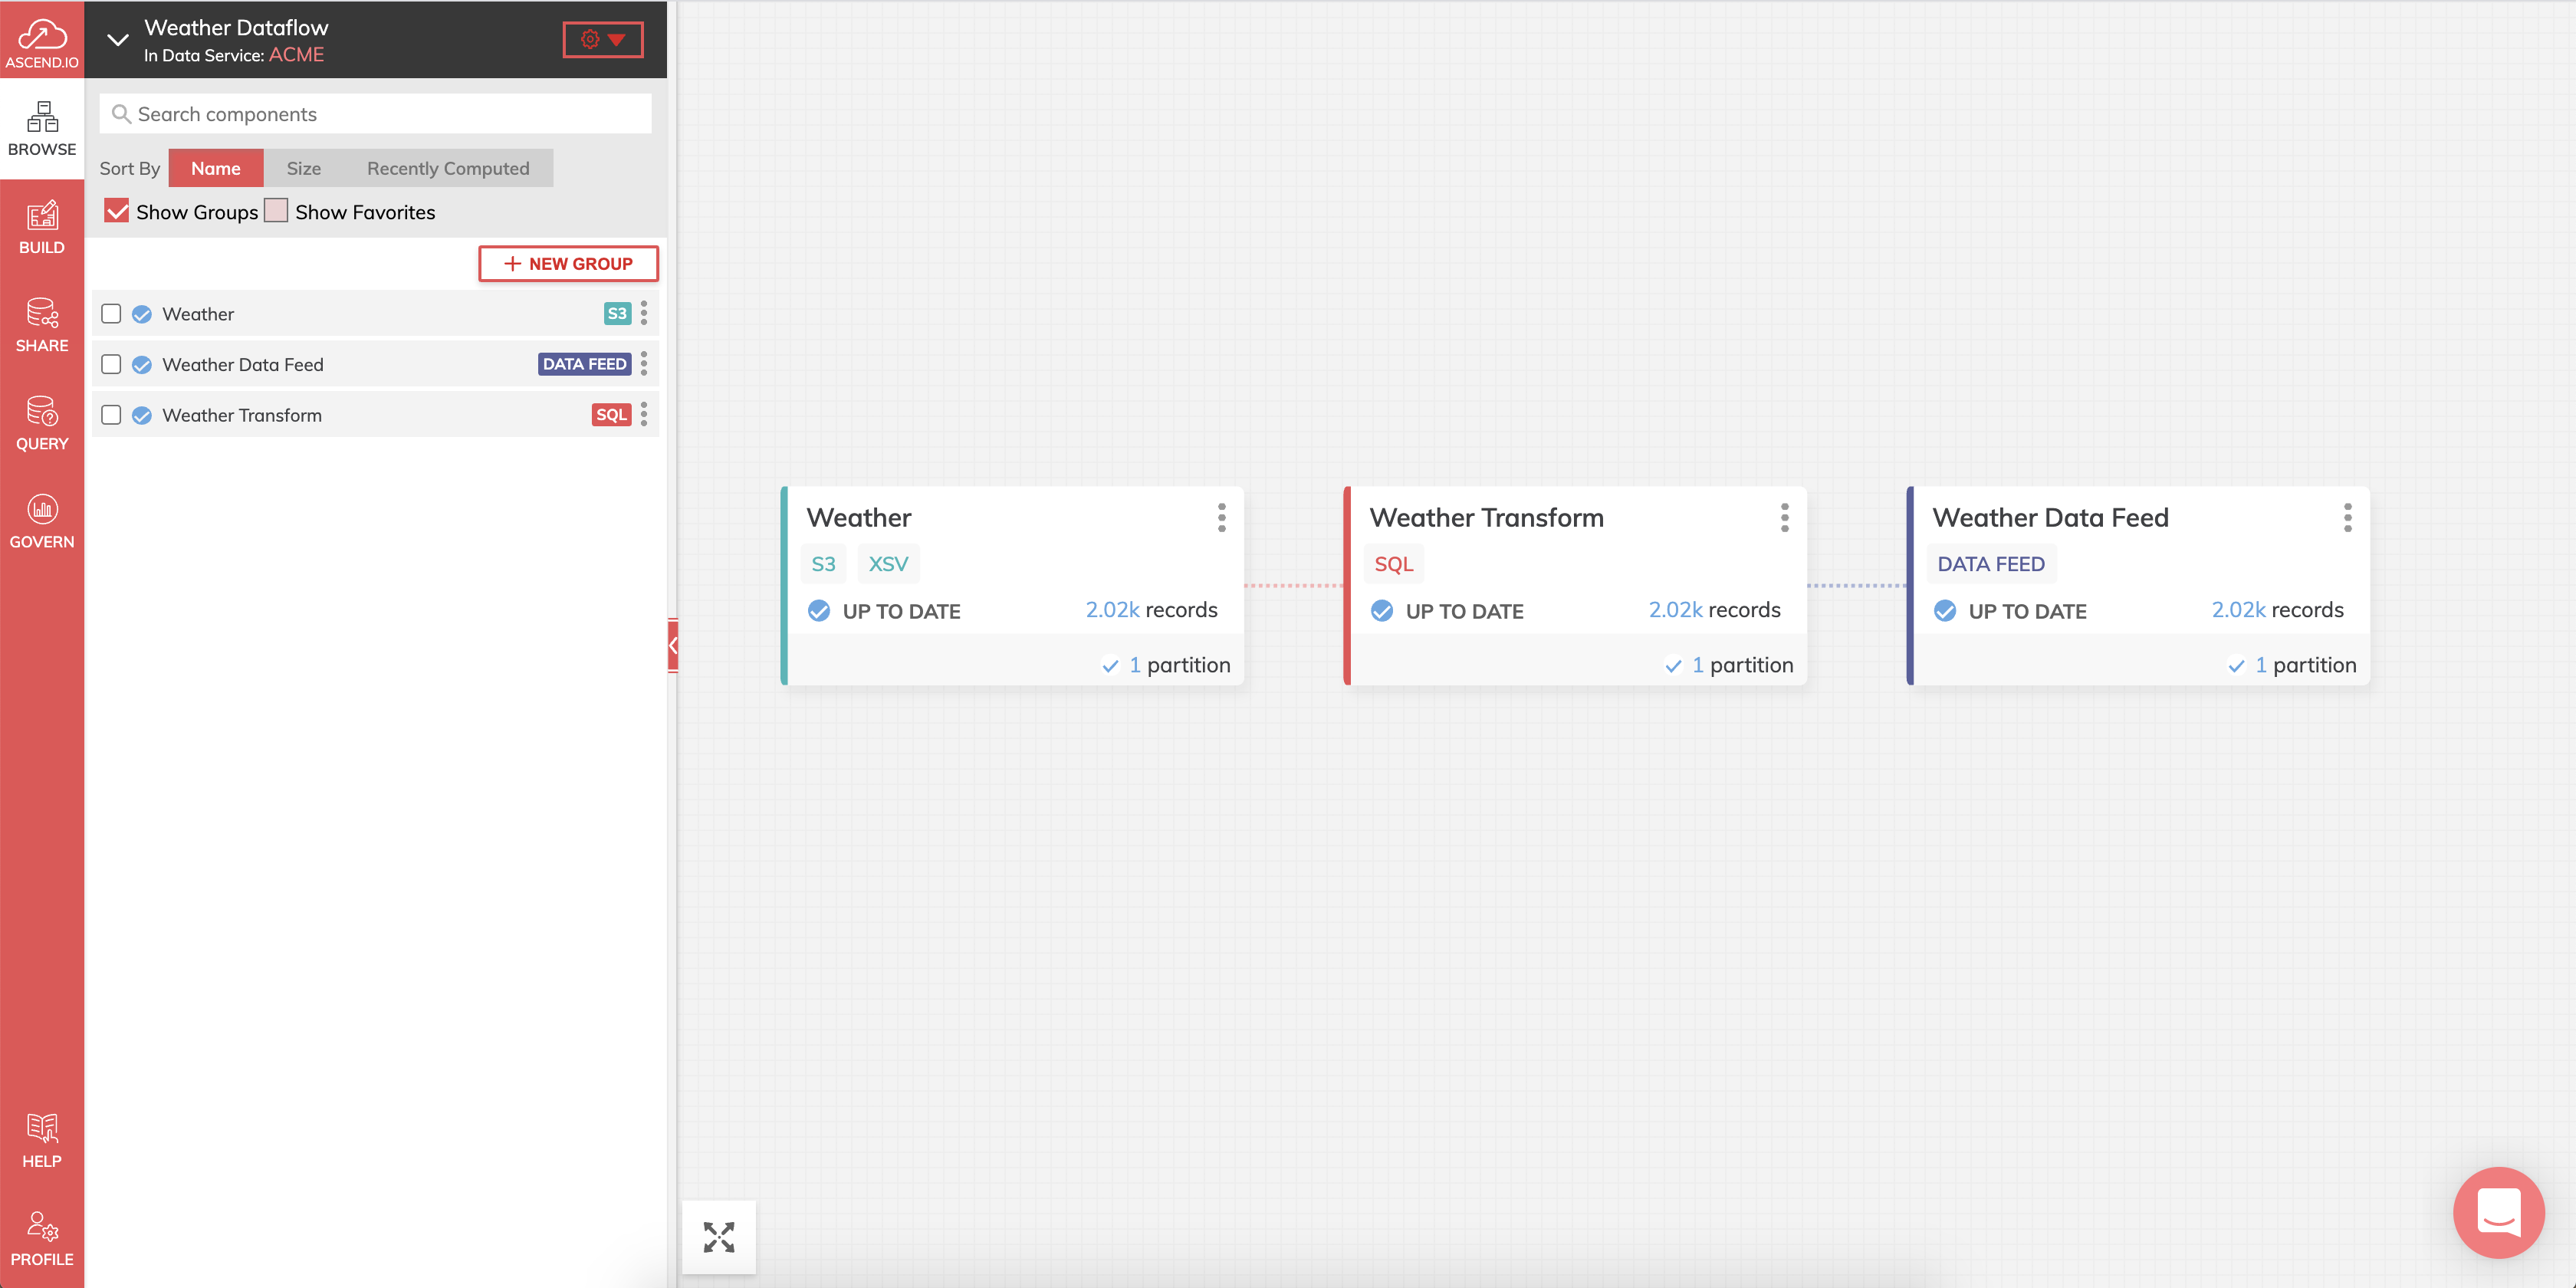
- Click CREATE and that’s it. You should see the Data Feed Connector on your Dataflow canvas (as shown below). You now have a dedicated data spigot that contains a very specific data set that you can allow others to subscribe to and build their Dataflows off of.

Wrapping it up
Congratulations on creating your first orchestrated Dataflow with Ascend. Hopefully, you now have an idea of how powerful Ascend can be. You've seen how easy it is to create Read Connectors, use SQL inside of Transforms, and make those results available and reuseable as Data Feeds. Here's what your Dataflow should look like.
Updated 11 months ago